This article is going to show you how to create custom 404 page on the WordPress site. In WordPress the 404 error page is part of the theme. However, this feature will work as long as you set the Permalink Structure to anything else but Default (Plain) under the Settings -> Permalinks section in the admin panel. 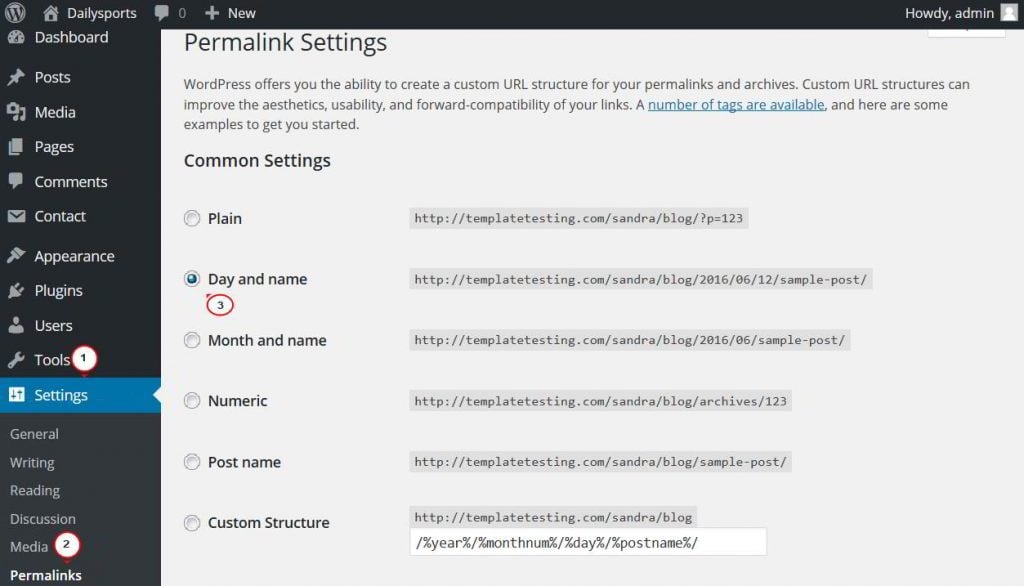 The best solution to create and customize your own 404 error page is to use a plugin. We recommend using 404page plugin. It allows you to create and edit your 404 error page as a normal page using the full power of WordPress and making use of all installed plugins and available shortcodes.
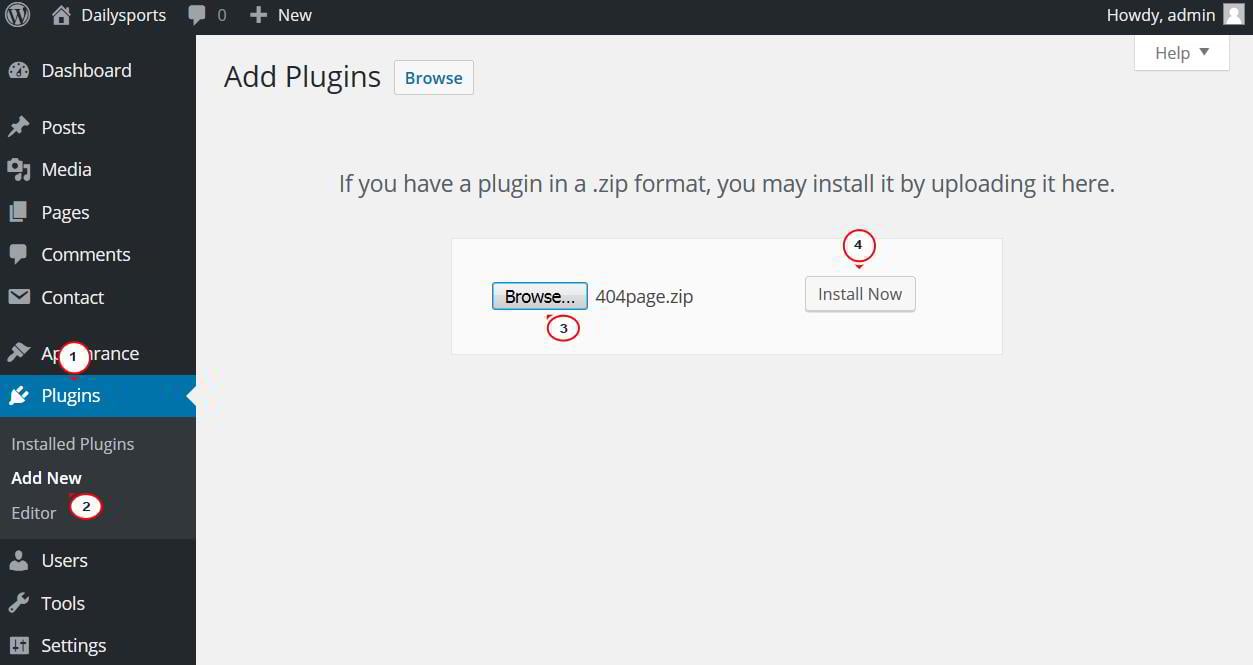
- download plugin file;
- install and activate it under the Plugins -> Add New -> Upload Plugin section in your WordPress admin panel.
 Once the plugin is installed and activated, navigate to the Appearance -> 404 Error Page section in the admin panel. You can manage the plugin's settings there.
  For instance, this is the default 404 error page of the WordPress theme:
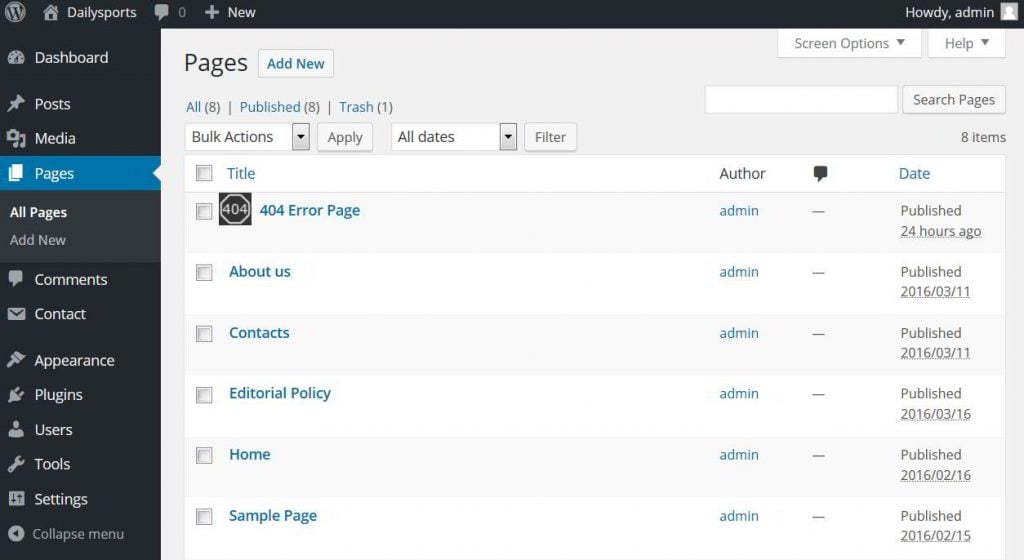
 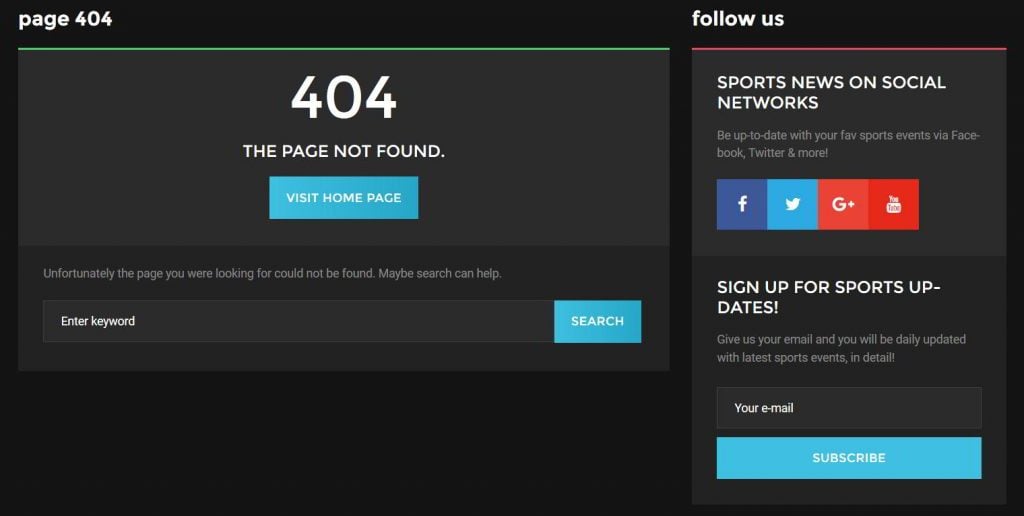 In order to create your custom 404 error page, you need to navigate to the Pages -> Add new section in the WordPress dashboard, and create a new page there.
 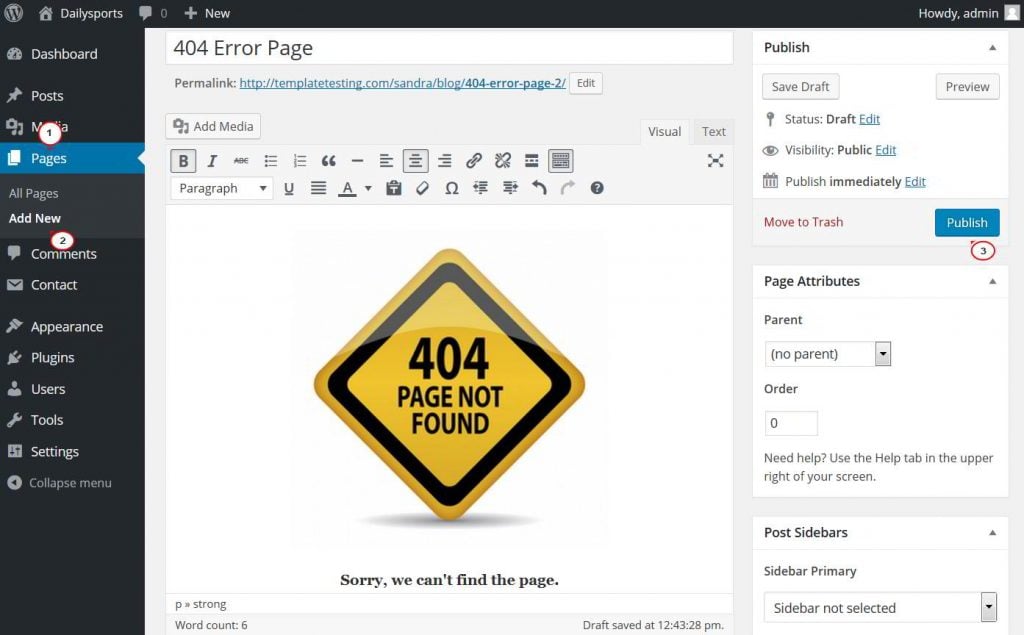 Once the page is created, go back to the Appearance -> 404 Error Page section. Let's review the plugin's settings:
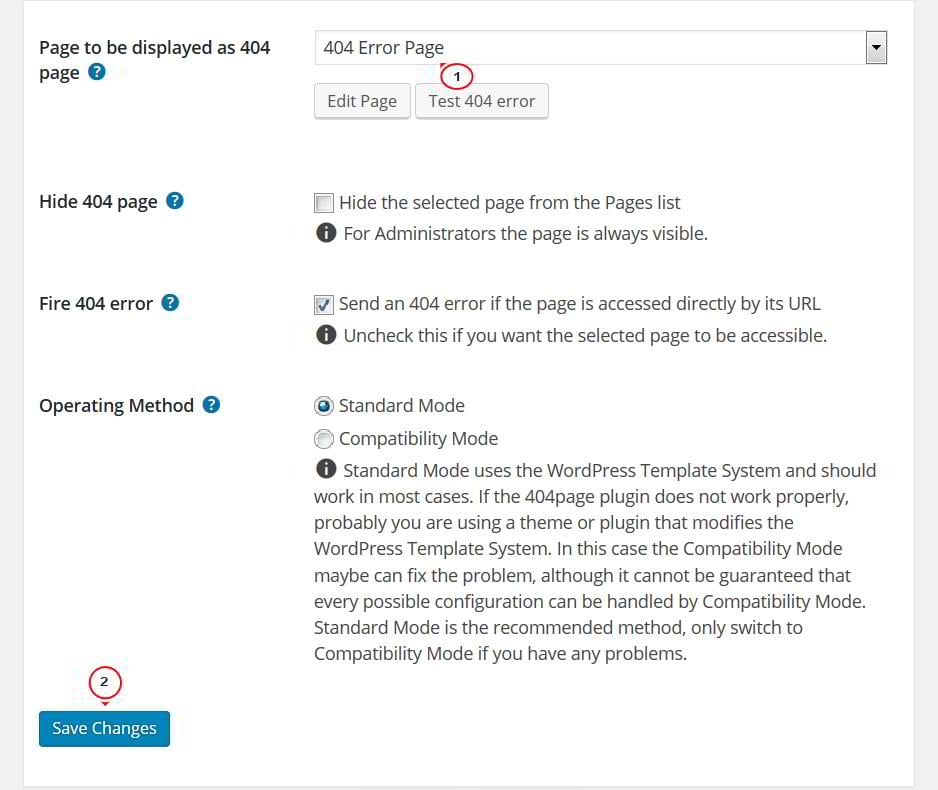
- Page to be displayed as 404 page - this option allows you to select the needed page that will be used as the 404 error page on your website. Choose your created 404 error page in the drop-down list, and press the Save changes button below.
 Once the page is selected and changes are saved, you can click the Test 404 error button to test it. Also, the Edit page button allows you to edit your custom 404 error page directly from here.
 - Hide 404 page - activating this option hides the page you selected as custom 404 error page from the Pages menu for non admin users. For admin users it is always visible and marked with the 404 page icon.
- Fire 404 error - this option is activated by default and it is recommended not to change this setting. With this option WordPress fires an 404 error in case the page you selected to be your custom 404 error page is accessed directly by its permalink. The only reason to deactivate this option is if you explicitly want the page to be accessible otherwhere.
- Operating Method - this setting has two options: Standard Mode and Compatibility Mode. Standard Mode is the default operating method and should work in most cases. This mode uses the WordPress Template System to detect and handle 404 errors. However, some plugins and themes bypass this task, thus the 404 page plugin does not work properly. In such cases you need to switch to Compatibility Mode.
 Once the page is selected and changes are saved, you can click the Test 404 error button to test it. Also, the Edit page button allows you to edit your custom 404 error page directly from here.
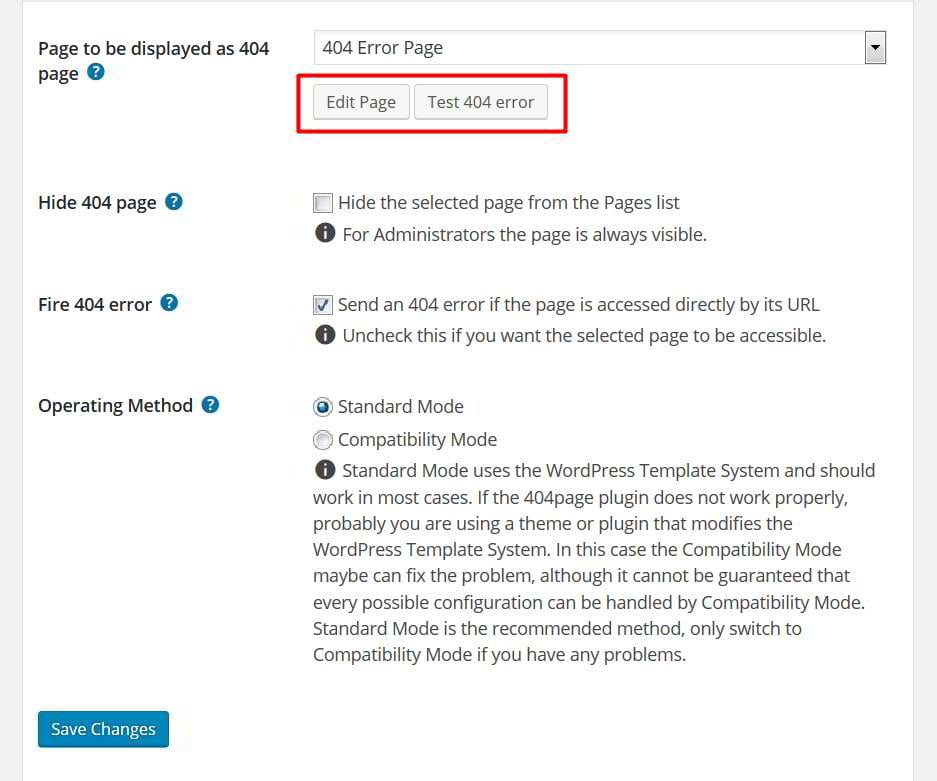
This is how the 404 error page looks like on the website after our modifications:  That's it. Now you know how to create 404 page on your WordPress website. We wish you good luck. Be sure to let us know if our help is required.
Beginner’s Guide to WordPress Redirection or How to Deal With Annoying 404’s
If you launched redesign of existing website, removed post or pages, or decided to change your permalinks, there is a huge chance your URL structure might change too. URL is a unique website address which helps you find a certain page in world wide web. If at least one character of the URL is changed, your users will land to 404 error (which is page not found).
That’s why redirects is a weapon number one to fight with annoying 404 pages. So, let’s get to know how to use redirects in WordPress and deal with 404 pages once and for all!
In a case page has been removed, visitors would see 404 page. However, if the content has been moved to different location of the site, you need to redirect visitors to other location.
In this guide we got covered all the questions regarding WordPress redirection: why it is so important, types of URL redirects, how to deal with 404, and how to easily setup and monitor your redirections in different ways. But first let’s find out why WordPress redirections are so important.
What is Redirection in WordPress?
Redirect is a way for your website to send a quick message to a browser and notify that the page has been moved, and point user to a different page instead. So, why you need to take time and set up your WordPress redirections? There are several reasons for it.
For your users:
- If your website is quite old and has useful content, there are chances that users bookmarked some pages. (And keep coming back to your site using these bookmarks)
- When a new site is launched with different URL structure, these bookmarks will show that the page is not found.
For search engines:
- Obviously, your old URl structure was indexed by search engines.
- If your new site changes the indexed URL structure, search engines would show pages are not found while the next crawl, which may seriously hurt your ranking (and overall SEO).
Types of URL Redirects
There are several types of WordPress redirects:
- 301 - Permanent Redirect
It’s used to tell search engines that the page were moved. In 99% it is the only type of redirect you need.
- 302 - Temporary Redirect
It’s used to tell search engine that the page were moved, but not forever.
- 303 - See Other Redirect
It may used on e-commerce sites during checkout process to ensure pages that has one-time data are not refreshed or bookmarked.
- 307 - Temporary Redirect
It’s similar to 303 with some changes the way information pass from page to page.
- 308 - Permanent Redirect
It’s similar to 307, but with permanent status.
What is 301 Redirect?
Let’s get a closer look at 301 WordPress redirect which is the most common one. It’s named after HTTP response status code 301, which informs search engines that a page was permanently moved.
301 redirects ensures that page rank and any other useful page info is transformed to its new URL. It means that all qualities of the redirected page will be passed into the detour page, which includes Page Rank, Page Authority, and traffic value. The old page will be removed from Google’s index and the new one will replace it.

You should use 301 redirect whenever a page URL was changed in order not affect search engine ranking and traffic.
You need to create 301 redirect when you’re planning to remove a page or post to replace it with new content.
You need to create 301 redirect when you’re going to change permalinks of your port or page.
If you don’t create redirects, your users will see 404 Page not found message. It’s not only bad for users and usability, but also can impact your site’s SEO.
How to Track 404 and Redirect Them
In order to see if your website has any 404 errors, you need to login to Google Webmaster Tools and go to Crawl Section. Then go to Crawls Error section, there Google highlights any page of your site that is unable to index.
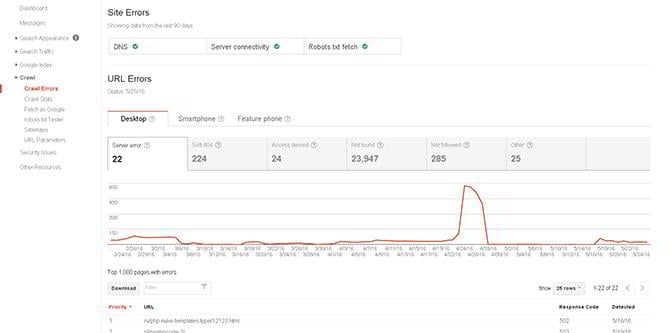
See the screenshot from Webmaster tools above.
Redirect Page Using Htaccess
I’m going to show you a few ways to redirect pages of your WordPress site, so you can choose the one convenient for you.
One tiny incorrect character in your .htaccess file is enough to put your website down, so keep it serious. Obviously, you should create a backup of the file before changing it in any way. It will help you to restore the file in a case something goes wrong.
If you use apache server, you can create 301 redirections with .htaccess file. You need just specify old and new locations. It can be done with the following code:
Redirect 301 /oldpage.html http://www.yourwebsite.com/newpage.html
You can redirect folder the same way. In fact, you can redirect the whole website using this code:
Redirect 301 / http://www.yournewwebsite.com
To make sure your redirection is working, load the page you’re redirecting. If everything is okay, you will be redirected to a new page.
Top 5 WordPress Redirect Plugins
If you’re not that tech-savy to use .htaccess file or PHP, or Java, there are a lot of redirection WordPress plugins that may do all the hard work for you. WordPress does not require to be a programmer to maintain a website.

With over half a million active installs, Redirection plugin is the most popular choice. It features 301 redirects and 404 error tracking. It also can help you to manage broken links on your site with more advanced options. It helps you to monitor all 404 errors and set them these to 301 redirects. It can also auto-generate redirects when you update a URL.
Quick Page/Post Redirect Plugin
Quick Page/Post Redirect Plugin has over 200,000 active installs which makes it a popular solution. For usual 301 redirects this plugin offers you Quick Redirects. It’s quite simple to use: just enter the requested URL and destination URL and the plugin will do the rest. This way to can fix incorrect permalinks, changed URLs, and content which has been moved. The plugin also has Individual Redirects which enables you to specify the redirection location and type.
Simple 301 Redirects would be useful for WordPress beginners and those who do not like advanced settings and complicated admins. This plugin deals with 301 redirection when you permanently moved content from one location to another. This plugin will be extremely useful if you are going to change domains or hosts.
Safe Redirect Manager can help you to redirect existing posts and pages. It allows redirects to whitelisted hosts only taking care about your security. This plugin is quite handy if you worry about security of your automated options, like redirects.
This amazing WordPress plugin can help you to fix 404 error links and redirect them to the homepage with 301. This plugin is very useful for your site’s SEO.
***
If you enjoyed this brief guide on WordPress redirection, feel free to like and share it via social media. Don’t hesitate to subscribe to our newsletter. More useful posts are on the way!

Get more to your email
Subscribe to our newsletter and access exclusive content and offers available only to MonsterPost subscribers.

Leave a Reply
You must be logged in to post a comment.