- Web templates
- E-commerce Templates
- CMS & Blog Templates
- Facebook Templates
- Website Builders
WordPress. How to install the engine to Just Host server (manual installation)
September 10, 2013
This tutorial is going to show you how to install WordPress engine on your Just Host server.
WordPress. How to install the engine to Just Host server (manual installation)
If you purchased a WordPress template and you are going to do a clean installation, first off you will need to download and install the Wordpress package for that.
Downloading WordPress
Open your web browser and google “wordpress”, then click WordPress › Blog Tool, Publishing Platform, and CMS or just go to http://wordpress.org.
- Click Download WordPress ## in the right section of the page (where #.# is the current version of WordPress, e.g. WordPress 3.6).
Make sure that your template is compatible with the latest version (you can see it stated on the preview page of the template in the list of the “Software Required”, otherwise you will need to download the required version at http://wordpress.org/download/release-archive/).
- After you clicked the button to download WordPress, a window is going to pop up asking you to save the file in the location selected by your web browser as default where you will need to click “Ok” or it will start downloading the file automatically depending on your browser configuration.
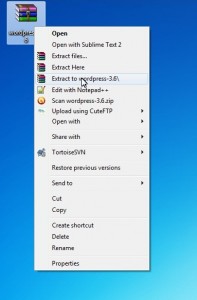
- At the end you will get a wordpress-3.6.zip file in the directory you saved it to. It’s a zipped folder which first needs to be unzipped and then zipped again before you upload it to your server. Using any unzipping program (for instance, WinZip which is used for that tutorial, so we suggest you download and install its trial version to follow the same steps). You need to right click that file and select “Extract to wordpress-3.6.zip”.
That will create an unzipped wordpress-3.6 folder.
- Double click the folder to open it. Inside you will find another folder called “wordpress”. Double click that folder to see its content.
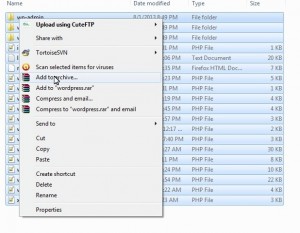
- The “wordpress” folder contains a whole bunch of files and folders that need to be uploaded to your server to start installing WordPress. The File Manager tool that comes with Justhost allows you to upload a zipped folder and then unzip it on your server. So you will need to select everything you have in the “wordpress” folder, right click on the content highlighted and select “Add to archive”.
- In the “Archive name and parameters” window that will pop up select .ZIP as the Archive format and click “Ok”.
- You will get a new wordpress.zip folder among these files which you need to upload to your server.
Uploading to server
The next step assumes you already have a domain registered with Justhost with the login details to access its Control panel.
- Log into the Control Panel of Justhost using the details that were sent to your via email.
- On the frontend page scroll down click the File Manager icon under the File Management section.
- By default the next page opens the root public_html folder. You need to decide if you want to access your site from www.mysite.com (where mysite is your domain name) – then the wordpress.zip file should be uploaded to the public_html directory, or if you want to open it from yoursite.com/wordpress (if you have some files in the public_html already) – then you will need to click New Folder at the top, enter a name for your sub-folder (e.g. wordpress) and click Create New Folder – that will create a new folder with the name you entered in the public_html directory which you will need to double click to open and upload the files.
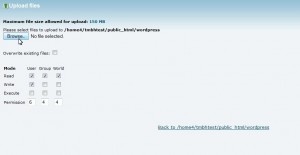
- Click Upload at the top menu
click Browse
and navigate to the wordpress.zip file on your computer.
- Double click the wordpress.zip file or click on it and click Open to start uploading the file.
At the bottom right corner you will see a timer that shows the uploading process.
- Once it’s finished uploading your file, click Back to… (directory where the file is uploaded).
- You will see the wordpress.zip folder in the directory you uploaded it to. Click on it to select, then click Extract at the top.
- In the window that pops up click Extract File(s).
A new window will show you the list of the files and folders that were extracted. Click Close.
- When the wordpress.zip is unzipped , you will no longer need it, so click on it to select, then click Delete. In the next window click Delete File(s).
- On the right click Go next to the field that shows the upload directory or just refresh the browser window. You will see the content of the unzipped wordpress folder you just deleted.
Installing WordPress
Now you can proceed to installing WordPress
- Open your web browser and type in your domain name (or your domain name / subdirectory) and click Enter.
- You are going to see the first page of installation. Click Create a Configuration File.
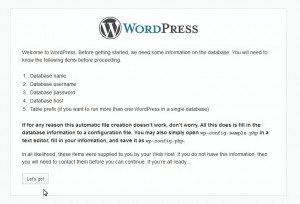
- Click Let’s Go! On the next page.
- For the next page you will need to create a database.
- Open the Justhost frontend page and click the MYSQL Database Wizard icon in the Database Tools section.
- At Step 1 enter a name for the new database and click Next Step.
- At Step 2 enter a username and generate a password. You may click Password Generator to create the password for you. Then click Create User.
- Step 3 requires adding the user to your database. Before you proceed we suggest you to copy the username, the database name and the password related info and save it in a text file on your computer.
Check ALL PRIVILLAGES and click Next Step.
- Step 4 means your database has been created and you can go back entering the WordPress installation page.
- Enter your database connection details. Leave the Database Host (localhost) and the Table Prefix (wp_) fields unchanged and click Submit.
- Click Run the Install on the Next page.
- Enter your Site Title, a username/password to log into your WordPress admin panel and your email address. This info can be changed anytime later. Click Install WordPress.
- WordPress has been installed. Click Login to log into your Wordpess admin with the details you entered previously.
- When you are in the backend of your WordPress site, click WordPress -> View Site in the top left corner to open its frontend.
You will see the default Wordprerss theme. Now you can proceed and install the template you purchased.
Creating database
Feel free to check the detailed video tutorial below:
WordPress. How to install the engine to Just Host server (manual installation)


