How to Make a Boring Design Scream [Customizing a Webinar Landing Page]
Everything begins with an idea.
Earl Nightingale
Probably everyone who has watched this kind of online seminar has thought something like: “I can do this too! I have a laptop and some knowledge to share, so why not? ”
I did:)
I ran my first webinar several months ago, and at that moment I knew almost nothing about webinars and how on earth to host them.
And you know what? That was an awesome experience. If you really love what you’re doing and want to let other people know about it and share your attitude, you will surely prove successful.
When it all started, I had a couple of days to prepare and almost no idea of what was going to happen.
The only thing that was prearranged was the advertising process. Lots of emails were sent, several types of banners were designed and published on the social networks, a video invitation was uploaded to YouTube channel and also shared… A lot of prep work was undertaken, but it was really worth doing! However, there was one thing that could have helped even more. The landing page, promoting the webinar.
And now I can tell you with certainty - the whole process is not as scary or expensive as one might expect.

About Webinars
But what is the reason to run a webinar? Why should you choose this type of lecture/workshop?First of all, let’s discover some of its benefits.
Webinars are becoming more and more popular nowadays because they have a lot of advantages.
The main ones are:
- Webinars are evergreen. Once the webinar is recorded, the visitors can watch it later or download the transcript if they need it.
- It’s a great way to show your expertise, share some helpful knowledge (helping people solve their problem), and drive high-quality leads at the same time.
- It’s a cost-efficient way to promote your products.
- It doesn’t require an extensive network; there’s no need to travel somewhere or even step out of your house to host a webinar.
- You can enhance the awareness of your brand and engage the audience by involving them in conversation and providing them the opportunity to ask questions.
- More than 60% of marketers are using webinars as part of their content marketing strategy. (Source: Content Marketing Institute)
- Among the leading tactics available, webinars are the second most effective type of premium content for marketers. (Source: Ascend 2)
So if you have something to say, if you need to spread the word about your business, if you like helping people or if you just like speaking publicly - a webinar is definitely your choice.
But how can you make people attend your webinar? How can you let them know that you’re going to share your knowledge?

If you do not want to be the only person attending this event, you need to create an advertisement. Don’t forget, if you promote your webinar well - it will promote you and your ideas!
Even if you have a low budget, there are some efficient ways to publicize it:
- Send emails to potential visitors.
- Record a video invitation.
- Use Facebook Ads Manager as one of the most effective ways of promotion.
- Create a landing page describing your webinar, and share the link with everyone via social networks, or email channel.
The last one sounds great, doesn’t it? How difficult is it to do it yourself? But, what problems may occur while creating/customizing the landing page?
A case study
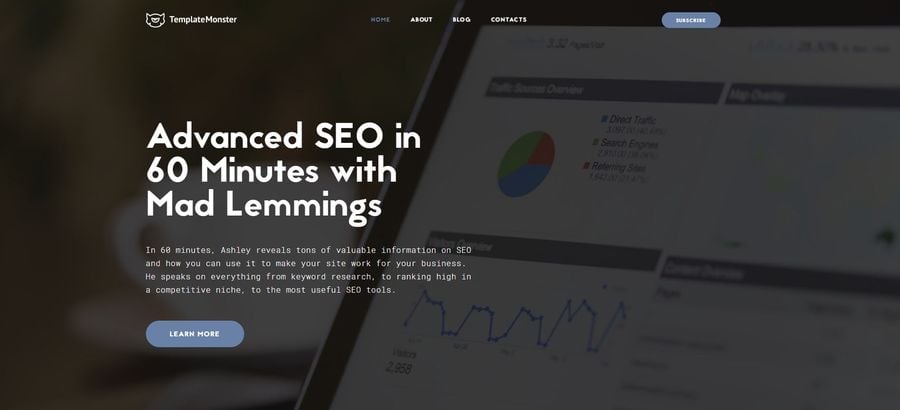
Let’s consider the webinar “Advanced SEO in 60 Minutes with Mad Lemmings” as a case study. By the way, feel free to watch it, if you haven’t already - it’s a real pot of gold for a contemporary marketer!And there’s an article “Advanced SEO in 10 Short Videos [Ashley Faulkes from Mad Lemmings speaking]”, where you can find the most prominent issues in the form of short videos. Let’s imagine we are going to run this webinar and need to promote it.
This time we won’t miss a thing. And even if we already know how to send the emails and publish banners via social networks, we may have no experience creating landing pages.
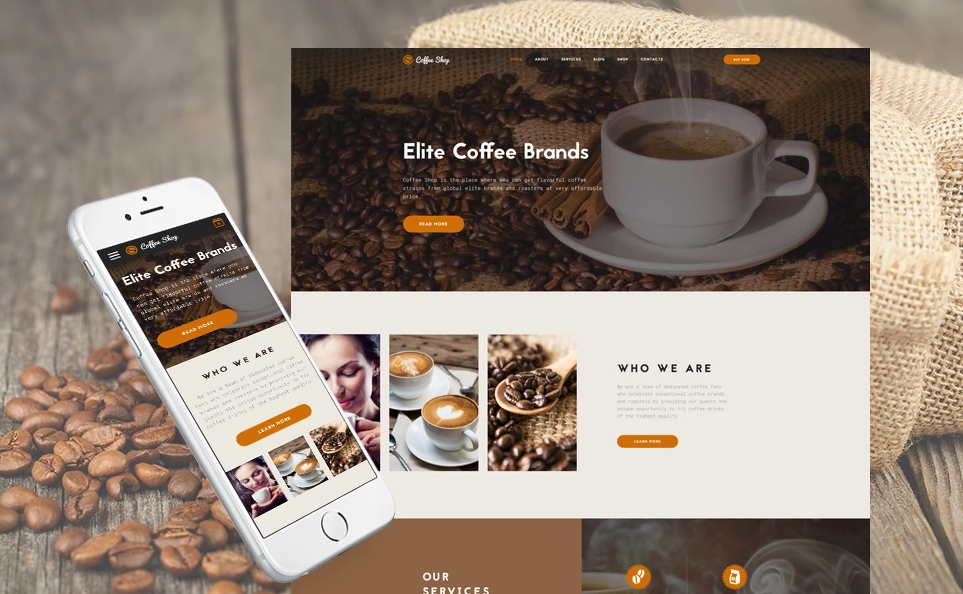
Let’s suppose we have downloaded a website template, but don’t know how to customize it. This Coffee theme can serve as a great example. After the installation, we’re ready to customize it.
What exactly are we going to change?
Concerning the content: we’ll change all texts (menu, headings, paragraphs, button texts, blurbs) and images (favicon, logo, background images and icons). As for the styles, we’ll edit the primary color which is used for buttons, links, and background colors.
What do we need to put this together?
- HTML/CSS editor or any IDE tool you’re familiar with (starting from Notepad++ and finishing with most popular IDEs like Sublime and JetBrains WebStorm/PhpStorm).
- The content itself - texts, images, logo, and favicon.
- A strong desire to create a cool landing page!
How much time will it take?
You may not believe this, but if you have already prepared all the necessary content, it’ll take you less than an hour to do all the rest.
Let us divide our template into sections - this way we can see which sections we can omit* and decide how to customize those that are left.
Template customization
Now we need to open the file index.html in the /site/ folder, and edit it section by section - all changes concerning the content will be made here.Everything concerning styles we’ll change in the style.css file, so you’ll have to open it as well.
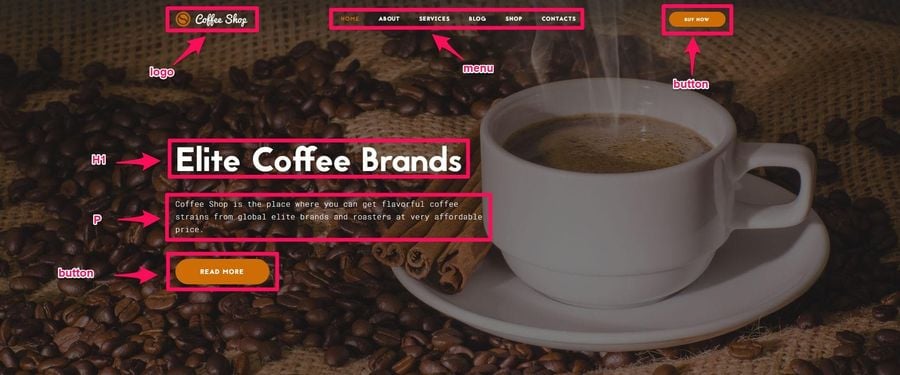
Section 1
- Favicon.
To change it, just copy your new favicon.ico file into the /images/ folder and replace the existing one. The only thing - if it has another name or extension, you’ll also need to rename it in the code.
On the next screen, the content elements which should be edited are highlighted.

- Changing logo.
Let’s find it in the code.
Now we have to copy the new logo into /images/ folder and replace the file name in the highlighted line. Note, that you’ll need to edit the width and height of your new logo.<div class="rd-navbar-panel"> <button data-rd-navbar-toggle=".rd-navbar-nav-wrap" class="rd-navbar-toggle"><span></span></button> <div class="rd-navbar-brand"><a href="index.html" class="brand-name"><img src="images/logo-default-185x41.png" alt="" width="185" height="41"/></a></div> </div>
- Editing menu.
As we don’t need some menu items on our landing page, like, ‘Services’ and ‘Shop’, we can remove them from the page structure.
Find them in the code, and remove all unnecessary items from the menu list:
<li><a href="about.html">About</a>
    <ul class="rd-navbar-dropdown">
        <li><a href="team.html">Our team</a>
        </li>
        <li><a href="testimonials.html">Testimonials</a>
        </li>
        <li><a href="faq.html">FAQ</a>
        </li>
    </ul>
</li>
<li><a href="services.html">Services</a>
</li>
<li><a href="blog.html">Blog</a>
    <ul class="rd-navbar-dropdown">
        <li><a href="single-post.html">Single post</a>
        </li>
    </ul>
</li>
<li><a href="shop.html">Shop</a>
    <ul class="rd-navbar-dropdown">
        <li><a href="single-product.html">Single product</a>
        </li>
        <li><a href="cart.html">Cart</a>
        </li>
        <li><a href="checkout.html">Checkout</a>
        </li>
    </ul>
</li>
<li><a href="#">Contacts</a>
    <ul class="rd-navbar-dropdown">
        <li><a href="contacts-1.html">Contacts 1</a>
        </li>
        <li><a href="contacts-2.html">Contacts 2</a>
        </li>
    </ul>
</li>
- Background-image.
Copy the new background image into /images/ folder (as you did with the logo) and rename the selected image title.
It’s not difficult to find the first section by its heading (h1 tag).
<section style="background-image: url(images/bg-image-4.jpg);" class="jumbotron-custom jumbotron-custom-2 bg-gray-base bg-image">
    <div class="jumbotron-custom-content">
        <div class="shell">
            <div class="range">
                <div class="cell-sm-10 cell-md-9 cell-lg-7">
                    <h1>Elite Coffee Brands</h1>
                    <p class="large">Coffee Shop is the place where you can get flavorful coffee strains from global elite brands and roasters at very affordable price.</p>
                    <a href="about.html" class="btn btn-style-1 btn-primary">read more</a>
                </div>
            </div>
        </div>
    </div>
</section>
- By the way, the h1 heading, the paragraph, which follows it, and the button text - can also be changed here.
<section style="background-image: url(images/bg-image-4.jpg);" class="jumbotron-custom jumbotron-custom-2 bg-gray-base bg-image">
    <div class="jumbotron-custom-content">
        <div class="shell">
            <div class="range">
                <div class="cell-sm-10 cell-md-9 cell-lg-7">
                    <h1>Elite Coffee Brands</h1>
                    <p class="large">Coffee Shop is the place where you can get flavorful coffee strains from global elite brands and roasters at very affordable price.</p>
                    <a href="about.html" class="btn btn-style-1 btn-primary">read more</a>
                </div>
            </div>
        </div>
    </div>
</section>
- Now let’s change the color which is used for buttons, links, icons and form labels - the primary color.
Open the /css/ folder and open the file ‘style.css’ for editing. Search for ‘.text-primary’ class and copy the hex color which is assigned to it. Using the text auto-replacement feature of your editor, replace it with the hex color you’ve chosen as a primary for your landing page. When all 129 occurrences are replaced, change the hover color (the second underlined on the screenshot) - it should differ slightly from the primary color (darker or lighter).
.text-capitalize {
  text-transform: capitalize;
}
.text-muted {
  color: #999;
}
.text-primary {
  color: #ce6d06;
}
a.text-primary:hover,
a.text-primary:focus {
  color: #9c5305;
}
After these changes are made we can view the result of customizing the first section:
Section 2
These are the elements we are going to change: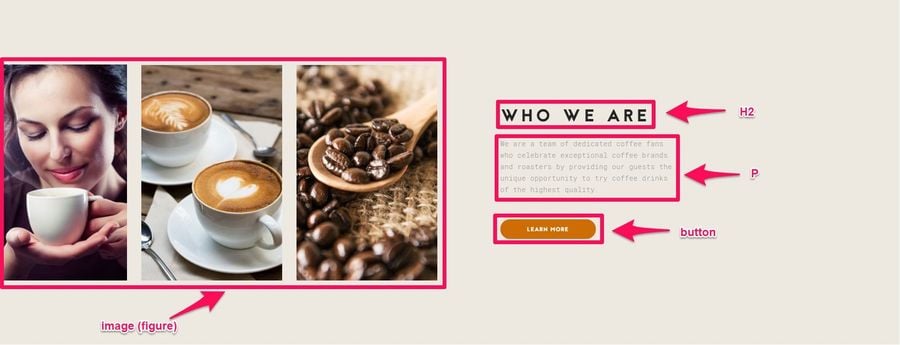
And we’re ready to start editing them.
- Texts.
Find this section in the code by its heading and replace the text selected on the screenshot with the new ones (the same way as in the previous section).
<section class="section-xl bg-periglacial-blue text-center text-md-left">
    <div class="shell-fluid shell-condensed">
        <div class="range range-md-reverse range-xs-middle range-md-right range-50">
            <div class="cell-md-5 cell-lg-4">
                <div class="inset-1">
                    <h2>WHO WE ARE</h2>
                    <div class="p text-width-smallest">
                        <p class="big">We are a team of dedicated coffee fans who celebrate exceptional coffee brands and roasters by providing our guests the unique opportunity to try coffee drinks of the highest quality.</p>
                    </div>
                    <a href="about.html" class="btn btn-sm btn-style-1 btn-primary">learn more</a>
                </div>
            </div>
            <div class="cell-md-7 cell-lg-6">
                <div class="row row-gutter-custom range-15">
                    <div class="col-xs-4">
                        <figure class="figure-fullwidth"><img src="images/about-1-300x460.jpg" alt="" width="300" height="460"/></figure>
                    </div>
                    <div class="col-xs-4">
                        <figure class="figure-fullwidth"><img src="images/about-2-300x460.jpg" alt="" width="300" height="460"/></figure>
                    </div>
                    <div class="col-xs-4">
                        <figure class="figure-fullwidth"><img src="images/about-3-300x460.jpg" alt="" width="300" height="460"/></figure>
                    </div>
                </div>
            </div>
        </div>
    </div>
</section>
- Images.
Let’s see how we can make two of them instead of three. Select one <div> element with the class .col-xs-4 and delete it. Previous blocks containing images now should have the class .col-xs-6 (as there are two of them left).Next, we replace the images. We’ll use the portraits of the participants of our webinar - Ashley Faulkes and Jeff Bell. Rename the image files used in the code and don’t forget to copy new files to the /images/ folder.<div class="cell-md-7 cell-lg-6"> <div class="row row-gutter-custom range-15"> <div class="col-xs-4"> <figure class="figure-fullwidth"><img src="images/about-1-300x460.jpg" alt="" width="300" height="460"/></figure> </div> <div class="col-xs-4"> <figure class="figure-fullwidth"><img src="images/about-2-300x460.jpg" alt="" width="300" height="460"/></figure> </div> <div class="col-xs-4"> <figure class="figure-fullwidth"><img src="images/about-3-300x460.jpg" alt="" width="300" height="460"/></figure> </div> </div> </div>
<div class="cell-md-7 cell-lg-6">
    <div class="row row-gutter-custom range-15">
        <div class="col-xs-6">
            <figure class="figure-fullwidth"><img src="images/about-1-300x460.jpg" alt="" width="300" height="460"/></figure>
        </div>
        <div class="col-xs-6">
            <figure class="figure-fullwidth"><img src="images/about-2-300x460.jpg" alt="" width="300" height="460"/></figure>
        </div>
    </div>
</div>
- The background color.
It can also be changed with a slightly lighter tint.The class which determines this color is highlighted in the following screenshot.We should find it in the ‘style.css’ file, copy the hex color assigned to it, and again, using the auto-replacement, substitute 4 occurrences with the new color.<section class="section-xl bg-periglacial-blue text-center text-md-left">
And this is how this section looks like after being changed!


Section 3
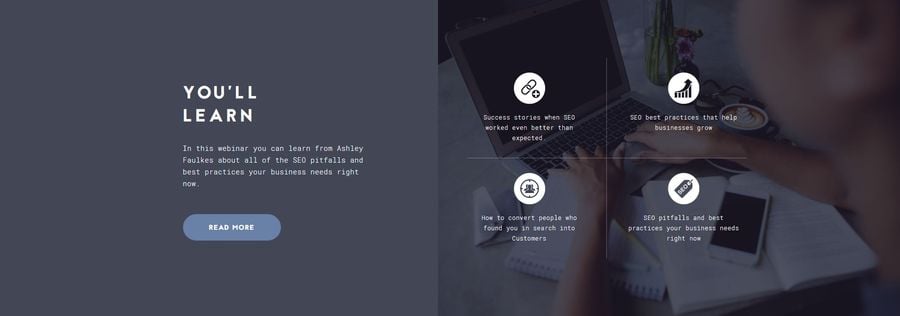
This section we’ll rename to ‘You’ll learn’, where we will provide the detailed information about the knowledge that can be obtained during the webinar.The elements we are going to change, are framed and waiting to be changed.
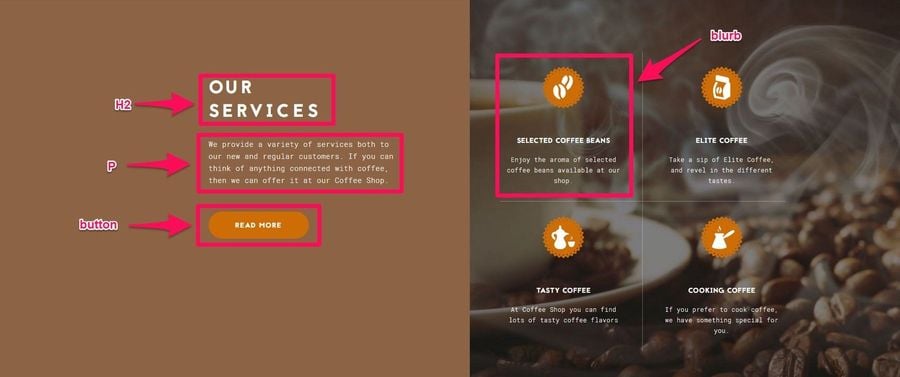
- Texts.
The way of editing is still the same - find the section in the code and edit it. The texts which are meant to be replaced in this section are highlighted in the following code box:
<section class="bg-gray-dark">
    <div class="shell-fluid shell-condensed">
        <div class="range range-condensed">
            <div class="cell-md-6 cell-md-6-mod-1 image-wrap-left bg-gray-dark">
                <div class="image-wrap-inner">
                    <h2>OUR<br>SERVICES</h2>
                    <p class="big">We provide a variety of services both to our new and regular customers. If you can think of anything connected with coffee, then we can offer it at our Coffee Shop.</p>
                    <a href="services.html" class="btn btn-style-1 btn-primary">read more</a>
                </div>
            </div>
            <div style="background-image: url(images/home-three-3-1011x800.jpg)" class="cell-md-6 cell-md-6-mod-2 image-wrap-right bg-gray-dark bg-image">
                <div class="image-wrap-inner">
                    <div class="range range-condensed range-inner-bordered">
                        <div class="cell-xs-6">
                            <article class="box-icon">
                                <figure class="box-icon-image"><img src="images/icon-service-3-84x84.png" alt="" width="84" height="84"/></figure>
                                <p class="box-icon-header"><a href="services.html">SELECTED coffee beans</a></p>
                                <p class="box-icon-text">Enjoy the aroma of selected coffee beans available at our shop.</p>
                            </article>
                        </div>
                        <div class="cell-xs-6">
                            <article class="box-icon">
                                <figure class="box-icon-image"><img src="images/icon-service-4-84x84.png" alt="" width="84" height="84"/></figure>
                                <p class="box-icon-header"><a href="services.html">elite coffee</a></p>
                                <p class="box-icon-text">Take a sip of Elite Coffee, and  revel in the different tastes.</p>
                            </article>
                        </div>
                        <div class="cell-xs-6">
                            <article class="box-icon">
                                <figure class="box-icon-image"><img src="images/icon-service-1-84x84.png" alt="" width="84" height="84"/></figure>
                                <p class="box-icon-header"><a href="services.html">Tasty coffee</a></p>
                                <p class="box-icon-text">At Coffee Shop you can find lots of tasty coffee flavors.</p>
                            </article>
                        </div>
                        <div class="cell-xs-6">
                            <article class="box-icon">
                                <figure class="box-icon-image"><img src="images/icon-service-2-84x84.png" alt="" width="84" height="84"/></figure>
                                <p class="box-icon-header"><a href="services.html">cooking coffee</a></p>
                                <p class="box-icon-text">If you prefer to cook coffee, we have something special for you.</p>
                            </article>
                        </div>
                    </div>
                </div>
            </div>
        </div>
    </div>
</section>
- Blurb icons/images.
To change the image, just copy the new one into the folder /images/ and change its file name in the code.
If you prefer, you can use not only images here, but also icon fonts. In this case you should implement them properly, using <i> or <span> tags instead of the <img> tag and adding the required styles in style.css file.<div class="cell-xs-6"> <article class="box-icon"> <figure class="box-icon-image"><img src="images/icon-service-3-84x84.png" alt="" width="84" height="84"/></figure> <p class="box-icon-header"><a href="services.html">SELECTED coffee beans</a></p> <p class="box-icon-text">Enjoy the aroma of selected coffee beans available at our shop.</p> </article> </div>
- Background-image.
The background image is edited like all previous images - by copying the new image to the /images/ folder and changing its name.
<div style="background-image: url(images/home-three-3-1011x800.jpg)" class="cell-md-6 cell-md-6-mod-2 image-wrap-right bg-gray-dark bg-image">
    <div class="image-wrap-inner">...</div>
</div>
- Background-color.
In the code let’s find the class, which sets the background-color for this section:
In the ‘style.css’ file we’re searching for this ‘.bg-gray-dark’ class and changing the hex of its background-color property to the one that fits our style.<section class="bg-gray-dark"> <div class="shell-fluid shell-condensed"> <div class="range range-condensed"> <div class="cell-md-6 cell-md-6-mod-1 image-wrap-left bg-gray-dark">...</div>> <div style="background-image: url(images/home-three-3-1011x800.jpg)" class="cell-md-6 cell-md-6-mod-2 image-wrap-right bg-gray-dark bg-image">...</div>> </div> </div> </section>
And this is the result of customizing the third section:
Section 4
These are the items to be changed: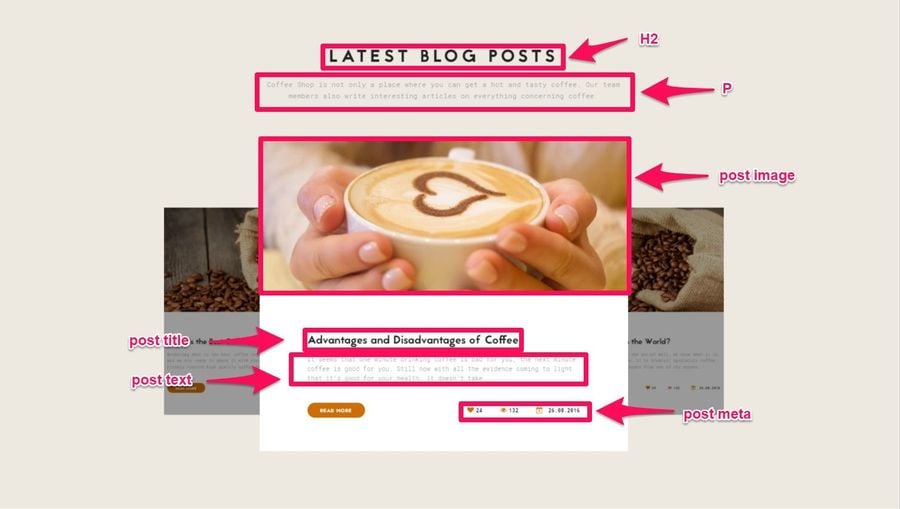
- Section title and description.
The process is still the same - the highlighted text is replaced.
<section class="section-lg bg-periglacial-blue text-center">
    <div class="shell">
        <div class="range range-sm-center range-75">
            <div class="cell-xs-12">
                <h2>latest blog posts</h2>
                <div class="p text-width-medium">
                    <p class="big">Coffee Shop is not only a place where you can get a hot and tasty coffee. Our team members also write interesting articles on everything concerning coffee.</p>
                </div>
            </div>
            <div class="cell-xs-12">...</div>
        </div>
    </div>
</section>
- Post content.
And this is how each post can be edited - the post image should be changed (and the file copied to /images/ folder). Its title, description, button text, and meta information - the number of likes, views and the date of publication - are also replaced.
Please note, that in order for the posts to appear correctly (like in the original template), there should be at least four of them in the HTML structure. To add more posts, just duplicate the element with ‘.item’ class and modify it according to your needs.<div class="item"> <div class="slick-slide-inner"> <article class="post-classic"><img src="images/blog-2-770x330.jpg" alt="" width="770" height="330" class="post-classic-image"/> <div class="post-classic-body"> <p class="post-classic-title"><a href="single-post.html">Advantages and Disadvantages of Coffee</a></p> <div class="post-classic-text"> <p>It seems that one minute drinking coffee is bad for you, the next minute coffee is good for you. Still now with all the evidence coming to light that it’s good for your health, it doesn’t take...</p> </div> <div class="post-classic-footer"> <div class="post-classic-footer-left"><a href="single-post.html" class="btn btn-xs btn-primary btn-circle">READ MORE</a></div> <div class="post-classic-footer-right"> <ul class="post-classic-meta"> <li><span class="icon icon-xxs icon-primary fa fa-heart"></span><span>24</span></li> <li><span class="icon icon-xxs icon-primary fa fa-eye"></span><span>132</span></li> <li><span class="icon icon-xxs icon-primary fa fa-calendar-plus-o"></span> <time datetime="2016-08-26">26.08.2016</time> </li> </ul> </div> </div> </div> </article> </div> </div>
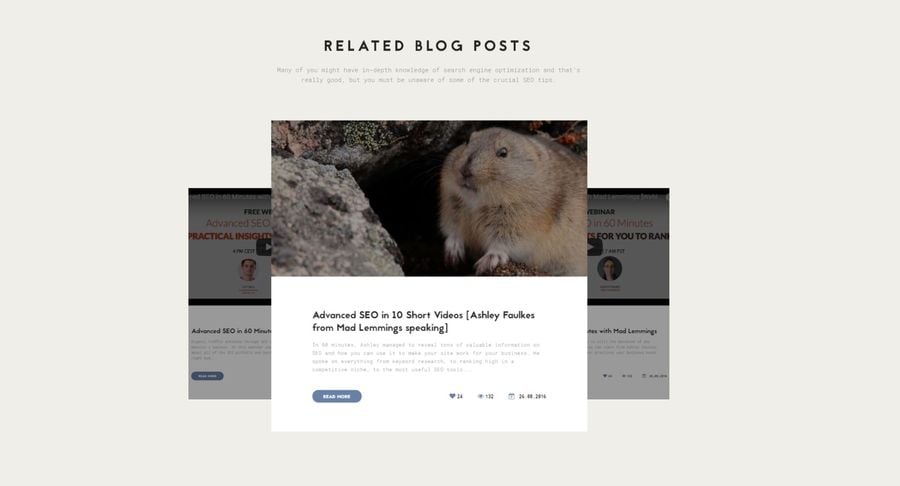
The modified section looks like this:
Section 5
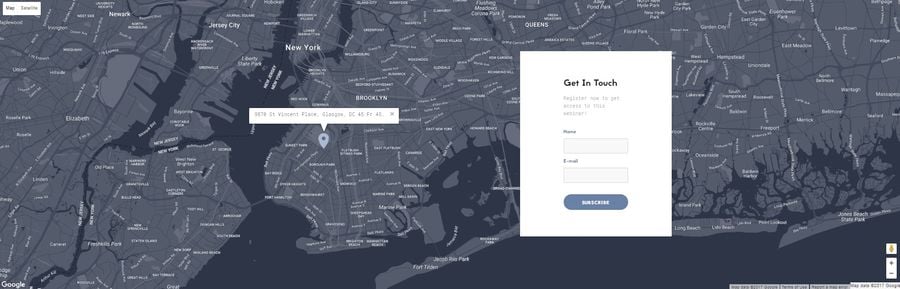
In this section, we’re going to change the form content, remove ‘Address’ and ‘Opening Hours’ blocks - as we do not need them and change some map properties.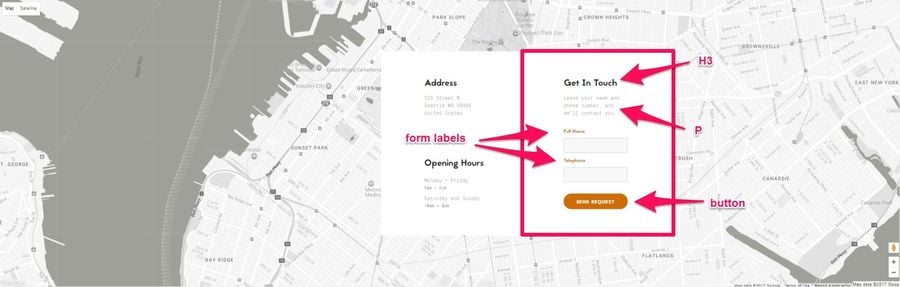
- Removing blocks.
We simply delete them from the structure:
<section class="box-wrap box-wrap-md bg-white"> <div class="box-wrap-map"> <div data-zoom="14" data-styles="[{"featureType":"administrative","elementType":"all","stylers":[{"saturation":"-100"}]},{"featureType":"administrative.province","elementType":"all","stylers":[{"visibility":"off"}]},{"featureType":"landscape","elementType":"all","stylers":[{"saturation":-100},{"lightness":65},{"visibility":"on"}]},{"featureType":"poi","elementType":"all","stylers":[{"saturation":-100},{"lightness":"50"},{"visibility":"simplified"}]},{"featureType":"road","elementType":"all","stylers":[{"saturation":"-100"}]},{"featureType":"road.highway","elementType":"all","stylers":[{"visibility":"simplified"}]},{"featureType":"road.arterial","elementType":"all","stylers":[{"lightness":"30"}]},{"featureType":"road.local","elementType":"all","stylers":[{"lightness":"40"}]},{"featureType":"transit","elementType":"all","stylers":[{"saturation":-100},{"visibility":"simplified"}]},{"featureType":"water","elementType":"geometry","stylers":[{"hue":"#ffff00"},{"lightness":-25},{"saturation":-97}]},{"featureType":"water","elementType":"labels","stylers":[{"lightness":-25},{"saturation":-100}]}]" class="rd-google-map rd-google-map__model"> <ul class="map_locations"></ul> </div> </div> <div class="box-wrap-content"> <div class="shell"> <div class="range"> <div class="cell-xs-12"> <div class="box-contacts box-contacts-horizontal box-wrap-content-interactive block-right"> <div class="box-contacts-col"> <div class="box-contacts-block"> <h3>Address</h3> <address>123 Street W, Seattle WA 99999 United States</address> </div> <div class="divider divider-nebula"></div> <div class="box-contacts-block"> <h3>Opening Hours</h3> <dl class="box-contacts-terms-list"> <dt>Monday – Friday</dt> <dd>9am - 6pm</dd> <dt>Saturday and Sunday</dt> <dd>10am - 4pm</dd> </dl> </div> </div> <div class="box-contacts-col box-contacts-right"> <div class="box-contacts-block"> <h3>Get In Touch</h3> <p>Leave your name and phone number, and we’ll contact you.</p> <form data-form-output="form-output-global" data-form-type="contact" method="post" action="bat/rd-mailform.php" class="rd-mailform"> <div class="form-group"> <label for="contact-full-name" class="form-label-outside">Full Name</label> <input id="contact-full-name" type="text" name="name" data-constraints="@Required" class="form-control"> </div> <div class="form-group"> <label for="contact-phone" class="form-label-outside">Telephone</label> <input id="contact-phone" type="text" name="phone" data-constraints="@Required @Numeric" class="form-control"> </div> <button type="submit" class="btn btn-sm btn-primary btn-block btn-circle">SEND REQUEST</button> </form> </div> </div> </div> </div> </div> </div> </div> </section>
.box-contacts {
    max-width: 770px;
}
.box-contacts-horizontal {
    display: -ms-flexbox;
    display: -webkit-flex;
    display: flex;
    -webkit-flex-direction: row;
    -ms-flex-direction: row;
    flex-direction: row;
}
The texts which you may possibly want to replace are highlighted in the following code box.
<div class="box-contacts-col box-contacts-right">
    <div class="box-contacts-block">
        <h3>Get In Touch</h3>
        <p>Leave your name and phone number, and we’ll contact you.</p>
        <form data-form-output="form-output-global" data-form-type="contact" method="post" action="bat/rd-mailform.php" class="rd-mailform">
            <div class="form-group">
                <label for="contact-full-name" class="form-label-outside">Full Name</label>
                <input id="contact-full-name" type="text" name="name" data-constraints="@Required" class="form-control">
            </div>
            <div class="form-group">
                <label for="contact-phone" class="form-label-outside">Telephone</label>
                <input id="contact-phone" type="text" name="phone" data-constraints="@Required @Numeric" class="form-control">
            </div>
            <button type="submit" class="btn btn-sm btn-primary btn-block btn-circle">SEND REQUEST</button>
        </form>
    </div>
</div>
Usually, webinars do not need location information as they are conducted online. But still, if you want to indicate some place where people can get some of your additional products or services - you may need to customize the map.
<div style="background-image: url(images/home-three-3-1011x800.jpg)" class="cell-md-6 cell-md-6-mod-2 image-wrap-right bg-gray-dark bg-image">
    <div class="image-wrap-inner">...</div>
</div>
- Map coordinates.
For customizing the map, the first thing is to find the coordinates of the place that we need to pin.
Then we add them to the child element of theblock with .box-wrap-map class.<div class="box-wrap-map"> <div data-zoom="14" data-x="-73.8924068" data-y="40.646197" data-styles="[{"featureType":"administrative","elementType":"all","stylers":[{"saturation":"-100"}]},{"featureType":"administrative.province","elementType":"all","stylers":[{"visibility":"off"}]},{"featureType":"landscape","elementType":"all","stylers":[{"saturation":-100},{"lightness":65},{"visibility":"on"}]},{"featureType":"poi","elementType":"all","stylers":[{"saturation":-100},{"lightness":"50"},{"visibility":"simplified"}]},{"featureType":"road","elementType":"all","stylers":[{"saturation":"-100"}]},{"featureType":"road.highway","elementType":"all","stylers":[{"visibility":"simplified"}]},{"featureType":"road.arterial","elementType":"all","stylers":[{"lightness":"30"}]},{"featureType":"road.local","elementType":"all","stylers":[{"lightness":"40"}]},{"featureType":"transit","elementType":"all","stylers":[{"saturation":-100},{"visibility":"simplified"}]},{"featureType":"water","elementType":"geometry","stylers":[{"hue":"#ffff00"},{"lightness":-25},{"saturation":-97}]},{"featureType":"water","elementType":"labels","stylers":[{"lightness":-25},{"saturation":-100}]}]" class="rd-google-map rd-google-map__model"> <ul class="map_locations"></ul> </div> </div>
- Zoom.
To zoom the map in or out, just change its ‘data-zoom’ attribute from 14 to 15 (and more - to zoom in) or to 13 (and less - to zoom out).
<div class="box-wrap-map"> <div data-zoom="14" data-x="-73.8924068" data-y="40.646197" data-styles="[{"featureType":"administrative","elementType":"all","stylers":[{"saturation":"-100"}]},{"featureType":"administrative.province","elementType":"all","stylers":[{"visibility":"off"}]},{"featureType":"landscape","elementType":"all","stylers":[{"saturation":-100},{"lightness":65},{"visibility":"on"}]},{"featureType":"poi","elementType":"all","stylers":[{"saturation":-100},{"lightness":"50"},{"visibility":"simplified"}]},{"featureType":"road","elementType":"all","stylers":[{"saturation":"-100"}]},{"featureType":"road.highway","elementType":"all","stylers":[{"visibility":"simplified"}]},{"featureType":"road.arterial","elementType":"all","stylers":[{"lightness":"30"}]},{"featureType":"road.local","elementType":"all","stylers":[{"lightness":"40"}]},{"featureType":"transit","elementType":"all","stylers":[{"saturation":-100},{"visibility":"simplified"}]},{"featureType":"water","elementType":"geometry","stylers":[{"hue":"#ffff00"},{"lightness":-25},{"saturation":-97}]},{"featureType":"water","elementType":"labels","stylers":[{"lightness":-25},{"saturation":-100}]}]" class="rd-google-map rd-google-map__model"> <ul class="map_locations"></ul> </div> </div>
- Map styles.
You can customize map styles yourself or use pre-made styles from Snazzy maps, for example. Just copy the map style and paste as a value of ‘data-styles’ attribute as in the following code box. We change this code:
with this one:<div class="box-wrap-map"> <div data-zoom="14" data-x="-73.8924068" data-y="40.646197" data-styles="[{"featureType":"administrative","elementType":"all","stylers":[{"saturation":"-100"}]},{"featureType":"administrative.province","elementType":"all","stylers":[{"visibility":"off"}]},{"featureType":"landscape","elementType":"all","stylers":[{"saturation":-100},{"lightness":65},{"visibility":"on"}]},{"featureType":"poi","elementType":"all","stylers":[{"saturation":-100},{"lightness":"50"},{"visibility":"simplified"}]},{"featureType":"road","elementType":"all","stylers":[{"saturation":"-100"}]},{"featureType":"road.highway","elementType":"all","stylers":[{"visibility":"simplified"}]},{"featureType":"road.arterial","elementType":"all","stylers":[{"lightness":"30"}]},{"featureType":"road.local","elementType":"all","stylers":[{"lightness":"40"}]},{"featureType":"transit","elementType":"all","stylers":[{"saturation":-100},{"visibility":"simplified"}]},{"featureType":"water","elementType":"geometry","stylers":[{"hue":"#ffff00"},{"lightness":-25},{"saturation":-97}]},{"featureType":"water","elementType":"labels","stylers":[{"lightness":-25},{"saturation":-100}]}]" class="rd-google-map rd-google-map__model"> <ul class="map_locations"></ul> </div> </div>
And, as a result, we've got a totally different map appearance!<div class="box-wrap-map"> <div data-zoom="12" data-x="-73.8924068" data-y="40.646197" data-styles='[{"featureType":"all","elementType":"labels.text.fill","stylers":[{"color":"#ffffff"}]},{"featureType":"all","elementType":"labels.text.stroke","stylers":[{"visibility":"on"},{"color":"#424b5b"},{"weight":2},{"gamma":"1"}]},{"featureType":"all","elementType":"labels.icon","stylers":[{"visibility":"off"}]},{"featureType":"administrative","elementType":"geometry","stylers":[{"weight":0.6},{"color":"#545b6b"},{"gamma":"0"}]},{"featureType":"landscape","elementType":"geometry","stylers":[{"color":"#545b6b"},{"gamma":"1"},{"weight":"10"}]},{"featureType":"poi","elementType":"geometry","stylers":[{"color":"#666c7b"}]},{"featureType":"poi.park","elementType":"geometry","stylers":[{"color":"#545b6b"}]},{"featureType":"road","elementType":"geometry","stylers":[{"color":"#424a5b"},{"lightness":"0"}]},{"featureType":"transit","elementType":"geometry","stylers":[{"color":"#666c7b"}]},{"featureType":"water","elementType":"geometry","stylers":[{"color":"#2e3546"}]}]' class="rd-google-map rd-google-map__model"> <ul class="map_locations"></ul> </div> </div>
- Locations.
Initially, there are no markers on the map, indicating a certain address. But you can add them quite easily. You can find the unordered list with ‘.map_locations’ class. To add a location, you need to place <li> element inside of it. It should contain coordinates and a paragraph with address, that will appear by clicking the pin marker. Each <li> item is used for one location on the map. You can add as many <li> tags as you need. This is an example of adding a location:
Let's add it as well to show you how it looks.<ul class="map_locations"> <li data-y="40.643180" data-x="-73.9874068"> <p>9870 St Vincent Place, Glasgow, DC 45 Fr 45.</p> </li> </ul>
We’ve customized the ‘Contacts’ section and can now observe the result:
By the way, you can change the pin marker, too. Just replace the gmap_marker.png and gmap_marker_active.png files in the /images/ folder with your own ones.
Section 6
In the last section, we’ll change mainly colors, and replace some texts as well.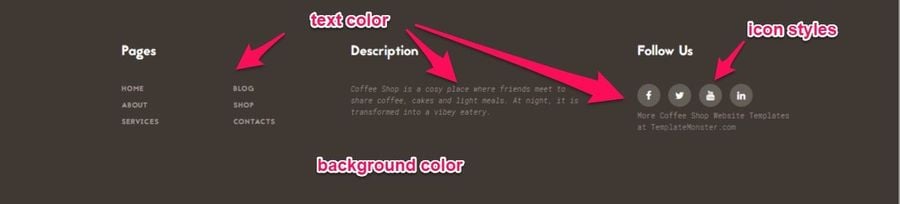
- Links.
As we do not need some sections, we remove the links in the footer, too:
<footer class="page-footer page-footer-variant-3">
    <div class="shell">
        <div class="range range-50">
            <div class="cell-sm-6 cell-md-4">
                <h3>Pages</h3>
                <div class="divider divider-conch"></div>
                <ul style="max-width: 390px;" class="footer-navigation row footer-navigation-vertical">
                    <li class="col-xs-6"><a href="index.html">Home</a></li>
                    <li class="col-xs-6"><a href="blog.html">Blog</a></li>
                    <li class="col-xs-6"><a href="about.html">About</a></li>
                    <li class="col-xs-6"><a href="shop.html">Shop</a></li>
                    <li class="col-xs-6"><a href="services.html">Services</a></li>
                    <li class="col-xs-6"><a href="contacts-1.html">Contacts</a></li>
                </ul>
            </div>
            <div class="cell-sm-6 cell-md-5">...</div>
            <div class="cell-sm-6 cell-md-3">...</div>
        </div>
    </div>
</footer>
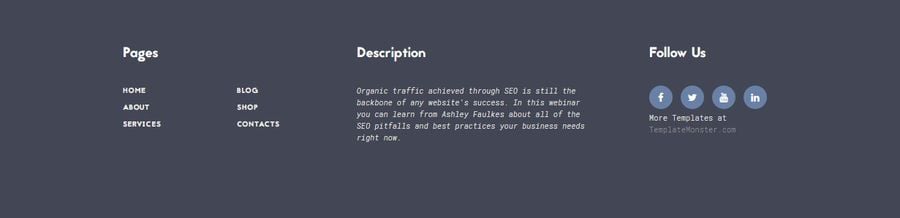
Then we edit the description:
<div class="cell-sm-6 cell-md-5">
    <h3>Description</h3>
    <div class="divider divider-conch"></div>
    <div class="text-highlighted-wrap">
        <p class="text-highlighted">Coffee Shop is a cosy place where friends meet to share coffee, cakes and light meals. At night, it is transformed into a vibey eatery.</p>
    </div>
</div>
To change the color of the background, we need to find the class, which determines this color. Footer element has 2 classes - .page-footer and .page-footer-variant-3. The last one has a background-color (background) property, that we have to change:
.page-footer.page-footer-variant-3 {
  padding: 60px 0;
  background: #403832;
}
The color of texts is identified by ‘color’ property in ‘.page-footer’ class. We simply find it and replace with the lighter color shade.
.page-footer {
  background: #fff;
  color: #a29d9a;
}
To edit icons in the ‘Follow us’ block, let’s find out the class containing the styles of these icons. Obviously, it’s ‘.icon-wild-sand-filled’ class.
<div class="cell-sm-6 cell-md-3">
    <h3>Follow Us</h3>
    <div class="divider divider-conch"></div>
    <ul class="inline-list inline-list-xs">
        <li><a href="#" class="icon icon-xs-outline icon-wild-sand-filled icon-circle fa-facebook"></a></li>
        <li><a href="#" class="icon icon-xs-outline icon-wild-sand-filled icon-circle fa-twitter"></a></li>
        <li><a href="#" class="icon icon-xs-outline icon-wild-sand-filled icon-circle fa-youtube"></a></li>
        <li><a href="#" class="icon icon-xs-outline icon-wild-sand-filled icon-circle fa-linkedin"></a></li>
    </ul>
    More Coffee Shop Website Templates at <a rel="nofollow" href="http://www.templatemonster.com/category/coffee-shop-website-templates/" target="_blank">TemplateMonster.com</a>
</div>
.page .icon-wild-sand-filled, .page .icon-wild-sand-filled:active, .page .icon-wild-sand-filled:focus {
  color: #fff;
  background: #645e59;
}

.page .icon-wild-sand-filled:hover {
  color: #fff;
  background: #ce6d06;
}
And now… we have our new footer!
The output
In the following lightboxes you can observe how the template looked before and how different it looks now: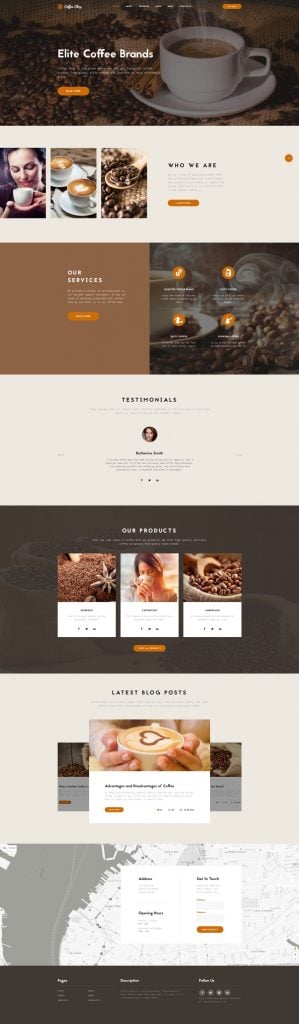

If you have no time to lose or you’re just pressed for time, you always can order the tune-up of your site at TM Service Center. With its help you can bring all your ideas to life, obtaining effortless and cost-effective services within the shortest period of time.

If you’re at a loss choosing a suitable template, thousands of marketing templates them are waiting for you at TemplateMonster.
Template from the tutorial - Coffee Shop Multipage Website Template
I hope you found this tutorial helpful, and don’t hesitate to ask questions if you have any.
I’m sure your first webinar will bring the grist to the mill and your visitors will ask for more!
Related posts
Designing Landing Pages to Maximize Conversions
12 Simple Landing Page Jobs on Upwork to Earn $3500+ in 2 Weeks
Let’s Analyze 100 Successful Landing Pages: Statistics and Food for Thought
You Have a Knack For Creating a Landing Page That Converts [You Just Don’t Realize That]
Generate Income from Leads with MotoCMS 3.0 Landing Page
Please Welcome the Brand New MotoCMS Landing Page Builder
15 Landing Page Builders to Break Free from Coding
Extensive Guide on Creating a Persuasive Landing Page [Free eBook]

Helen is a Technical Writer at TemplateMonster, passionate about WordPress and creating chatbots. Follow her on Quora.
Get more to your email
Subscribe to our newsletter and access exclusive content and offers available only to MonsterPost subscribers.

Leave a Reply
You must be logged in to post a comment.