Speeding up WordPress with Transients
- What are WordPress Transients?
- How to use the Transient API
- When to use the Transients
- When not to use Transients
- Control your Transients
- Website Speed Optimization Service
WordPress sites, as any other, can get slower if there are complex queries or data structure. Caching fragments of that data can be helpful and could also speed up your WordPress site. Transients API can help you with that. In this article, you will learn how to use them and when not to use them.
What are WordPress Transients?
Transients are cached fragments of data. The cached data is stored in the database, but only for a fixed amount of time. Other plugins, such as Memcached Object Cache, can use the API to store the data in the memory, thus speeding up the site even more.

It may seem that Transients are the same as options, but that is not true. The difference is in their expiration. The expiration is set in seconds, so if we set the transient to live for the next 3600 seconds, it will mean that the Transient is available for the next hour.
After that, the cached data is not available. We need to have a way to create the data even when there is no transient.
Transient Workflow
It is important to understand the Transient API and the whole caching scenario. We do want the data to be always available, even where there is no cached data.
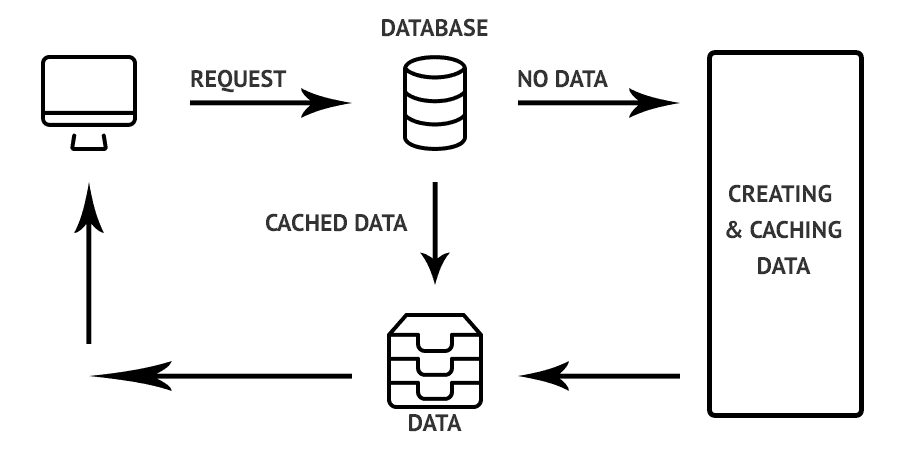
We also need to understand that we have to delete the cached data if some of the parts change before the expiration.
Here is a simple explanation of the workflow:
- Check if the cached data is available
- If not, create the data to cache
- Cache the created data
- Work with the data
When we have already cached our data, the whole workflow would consist only of the 1st and 4th point.
Transients API
The image above shows us the whole caching workflow. We need to know the Transients API before we start implementing it inside the workflow.
Transients API consists of three functions:
- set_transient()
- get_transient()
- delete_transient()
Function set_transient
This function is used for setting the transient by its name, value, and expiration.
set_transient( $trans_name, $value, $expiration );
Those three parameters are:
- $trans_name - a string, the transient name that we will use to get or delete
- $value - can be a number, string, complex object such as WP_Query or just an array
- $expiration - duration in seconds
Understanding the Expiration
Transient exists from the moment it gets created. The expiration is relative to the time of creation. If we set the expiration to be 1 minute, the transient will last 60 seconds from the moment it is created.
WordPress has some constants defined that can help us calculating the time:
- HOUR_IN_SECONDS - 1 hour in seconds
- MINUTE_IN_SECONDS - 1 minute in seconds
- DAY_IN_SECONDS
- WEEK_IN_SECONDS
- MONTH_IN_SECONDS (it will use 30 days and not 31 or 28)
- YEAR_IN_SECONDS (it will use 365 days and not 366)
Function get_transient
When retrieving the cached data, we need to use this function. If there is no value or cached data, this function will return false.
- get_transient( $trans_name );
- We just need to provide the transient name to get the data.
Function delete_transient
This function can be used for more control over the Transient cached data. Be sure to delete a transient when the cached data changes.
delete_transient( $trans_name );
How to use the Transient API
If we are going to refer to the previous diagram, we will first try to fetch the data from the database. Let’s give it a name to our transient:
my_transient.
1. Getting the Data
Let’s try to get the transient:
$data = get_transient( ‘my_transient’ );
If the $data is false, then it means that there is no cached data. We can check that with this code snippet:
if( false === ( $data = get_transient( ‘my_transient’ ) ) {
// Create the data
}
2. Create & Cache the Data
Let’s suppose that we are fetching the data for the first time. The cached data does not exist. We need to create the data and cache it.
if( false === ( $data = get_transient( ‘my_transient’ ) ) {
$data = creating_the_data();
set_transient( ‘my_transient’, $data, 2 * HOUR_IN_SECONDS );
}
The function creating_the_data() is just there to represent this step. We can have that logic placed in a separate function like here or we can do all the logic inside here.
The last step is to cache the data with the function set_transient(). We are caching this data for the next 2 hours.
3. Refreshing Data
When working with Transients API or any other caching system, we need to understand how to control the cache.
We don’t want to deliver outdated data from the cache.
If the above data needs to be updated based on a new post or any other event, then we need to delete our transient.
delete_transient( ‘my_transient’ );
When to use the Transients
Transients API should be used when we want to work with some temporary data or complex data that could take up our resources.
1. Retrieving Data from 3rd Party API
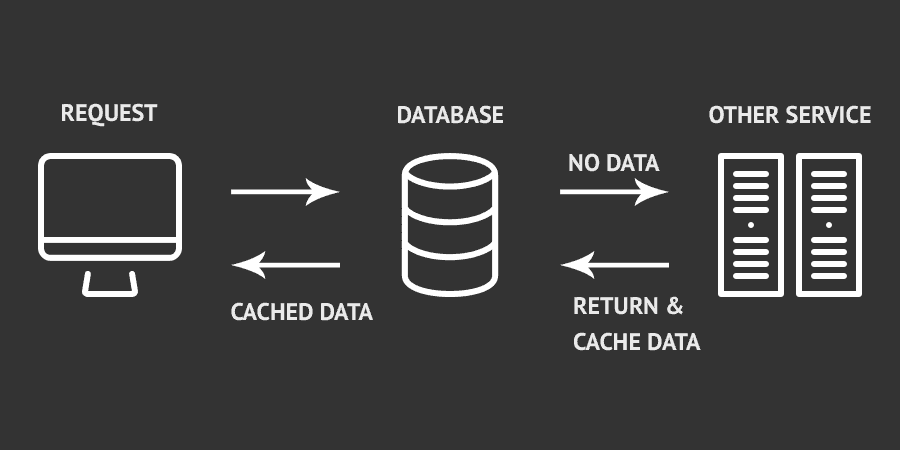
Using 3rd Party APIs can be a big hit to your site performance. What if the server is unresponsive for 2-3 seconds? You could have a slow page load just on that.
You can save the results from the 3rd Party APIs in a transient and store them for hours or even days if you are sure the data will not change.
if( false == ( $service_data = get_transient( ‘get_subscribers_from_service’ ) ) ) {
   $service_url = ‘https://api.service.com/v3/subscribers’;
   $service_data = wp_remote_get( $service_url );
   set_transient( ‘get_subscribers_from_service’, $service_data, 1 * DAY_IN_SECONDS );
}
Why Transients?
With the Transients API, you can get the results in an instant since the response is cached on your site.
Refreshing Data?
Refreshing data from such service is possible only if the service provides a webhook. You can then create a webhook that will send the data to your site and you will know if you need to delete the transient or not.
We can assume that we have created a webhook on the service. This webhook will send data to our site in the form http://my_site.com/?delete_transient=TRANSIENT_NAME.
add_action( ‘init’, ‘check_for_webhook’ );
function check_for_webhook() {
  if( isset( $_GET[‘delete_transient’] ) ) {
     // Check if this is our own transient, we don’t want to delete some    other transient
     if( transient_is_from_my_plugin( $_GET[‘delete_transient’] ) ) {
          delete_transient( $_GET[‘delete_transient’] );
     }
  }
}
You could create a settings page with all the transients listed there and provide a button to refresh certain transients.
2. Complex Data
Having complex data sets on your site can also be a huge hit on the performance. You could structure the data given from the complex queries and save them using the Transients API.
You could store such data in an array and save that array instead of having to retrieve everything always. But be sure to use that only on something that can be temporary. Let’s say that we have a complex query on popular or related posts.

Since the result can change in a day, we could save such data with the Transients API and have it refreshed each day.
Here is a simple example, which you don’t need to use but it can give you the picture on how to use it.
function list_posts() {

 if( false == ( $posts_array = get_transient( 'posts_array' ) ) ) {
  $posts = get_posts( array(
   'post_type' => 'post',
   'posts_per_page' => 20,
   'post_status' => 'publish'
  ) );

  $posts_array = array();

  foreach ( $posts as $post ) {
   $author = new WP_User( $post->post_author );
   $posts_array[] = array(
    'link' => get_permalink( $post->ID ),
    'title' => $post->post_title,
    'author_link' => get_author_posts_url( $post->post_author ),
    'author' => $author->get('user_nicename')
   );
  }
  set_transient( 'posts_array', $posts_array, 2 * HOUR_IN_SECONDS );
 }

 echo '<ul>';
 foreach ( $posts_array as $post ) {

  echo '<li><a href="' . $post['link'] . '">' . $post['title'] . '</a><br/>';
  echo '<em><a href="' . $post['author_link'] . '">' . $post['author'] . '</a></em>';
  echo '</li>';
 }
 echo '</ul>';
}
Let’s now look at the performance before and after Transients API.
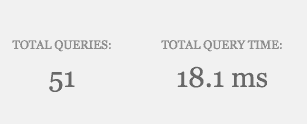
Before I have included the Transients API, the WordPress page loaded within 18.1ms and with 51 queries.
After the Transients API have been included within the code, the query time dropped to 10ms and there were 45 queries.
Since this is on my local machine and it runs pretty fast, the performance maybe is not that visible. But you can imagine how a high traffic website could benefit from it.
With the Transients API we have lowered the queries by 20% and the query time by 45%. You can’t ignore this numbers.
When not to use Transients
Transients should not be used if you are working with the data that is not temporary or even if you can store it in a different way such as social media counts in the post meta table.
Always look at some alternatives if the data needs to be cached but also not for a limited time. You can use the meta tables or create your own tables to implement your caching solutions.
You can read more about the alternatives in a great article written by pressjitsu.
Remember: Transients API is not the only possible solution for caching data, but it can be used for various temporary data structures.
Control your Transients
In a recent article I have written about transients and if you should use them, I did mention that you should control your transients.
Why? Some transients could be abandoned and thus waste the database resources.
When you use the Transients API in your plugins or themes, be sure to delete all of them on deactivation. You could have something like this:
register_deactivation_hook( __FILE__, ‘delete_transients_on_deactivation’ );
function delete_transients_on_deactivation() {
$transients = array(
‘my_transient’,
‘my_transient2’);
foreach( $transients as $transient ) {
delete_transient( $transient );
}
}
Website Speed Optimization Service

By the way, if you need to speed up your website speed using no complicated codes and transients, check out our Website Speed Optimization Service. Using this simple service, you can make the website pages load faster up to 50%. How does it work and what is the reason for downloading the service? Check out what you get with this service:
- performance and speed analysis where you can check the status of both;
- content and database optimization: to increase the speed of loading and to provide your website with good search ranking results, we will optimize the content of the website; also, we will delete unused plugins and compress the size of the images. Don’t worry about their quality;
- source files minimization: we will reduce the sizes of HTML, CSS, and JavaScript files, so they will load quite faster;
- compressing and caching enabling: that means that we will enable compressing with browser caching to reduce the loading time of your website;
- detailed report: you will get a detailed report from us with the results of performed speed optimization.
By the by, the delivery time for CMS sites (like those on the WordPress, Joomla, and similar platforms) is up to 3 business days. The delivery time for Online Stores (for example, those made with the help of platforms like OpenCart, Prestashop, Magento, WooCommerce, etc.) is up to 5 business days.
What to do if you want to use the service? Everything is quite simple. Firstly, purchase the service. After that, we will connect with you via e-mail and you have to provide us with access to your admin panel and your hosting account. Then, we make all the customization by ourselves totally helping you with it. After we have done it, sure thing we will inform you. You can check all the improvements, and if you need some additional optimizations, just inform us. You have only one free revision. Note, that this speed optimization service is valid for one website only.
Conclusion
The WordPress Transients API enables you to cache fragments of data with a simple set of functions. You should be aware of the data structure and think twice if you should cache the data with the Transients API.
Don’t take them for granted and be sure to control your own transients and to established a good cache control workflow.

Posting contributed articles about the major web design highlights and novelties. Come across a handful of useful tutorials and guides shared by experts in the web design and online marketing fields.
Get more to your email
Subscribe to our newsletter and access exclusive content and offers available only to MonsterPost subscribers.

Leave a Reply
You must be logged in to post a comment.