The complete installation method can be used if you want to set up a Magento store using a sample content. We assume that you have completed all the preparation steps.
The installation process consists of 3 stages:
Creating a database.
Uploading all the required files to the server.
Installing a Magento Commerce engine together with the template you have purchased.
Let's get started!
If you don't want to spend your time installing the template, don't hesitate to order installation service using our live-chat.
Creating a database
First, you need to prepare a new database for your Magento store. You can create the new database using the database management tool from your hosting control panel (usually PhpMyAdmin).
The following data will be received while creating a database: database name, database username, password and you server name. You need to save this data as you will need it for further Magento installation.
With the phpMyAdmin tool you will be able to create a new database in 3 simple steps(check the slides below):
Open the "Database" tab, you will see the list of databases.
Input your database name. Click "Create" button.
Your database has appeared in the list. In order to enter the database, click on its name in the list.
If you have any issues with creating a database, please contact your hosting provider for help and assistance.
Sample data import
Magento template package contains the sample data file (dump.sql or dump.gz). This file is located under the /sources/sample_data folder of your template. It allows you to load sample data, so that your website looks exactly like our demo template.
Do not import dump.sql.gz if you already have the data on your site. By importing dump.sql.gz all the products will be erased from your store. If you do not want to install sample data, use clean database while installing Magento. Skip the sample data installation step.
In order to install the dump file, follow the steps below:
Log into PhpMyAdmin and the select the database that you will use for Magento Commerce (It was created by you with the help of the steps provided earlier).
Navigate to "Import" tab and click "Browse" button.
Find the "/sources/sample_data" folder of your template and select the dump.sql.gz.file. Click "GO". The import process can take a few minutes.
Uploading and unzipping
To start working with Magento you need to upload files to your hosting server. This can be done using your hosting file manager or some third party FTP manager.
Type the path to the 'unzip.php' file on your server (http://your_domain_name/unzip.php) in your browser.
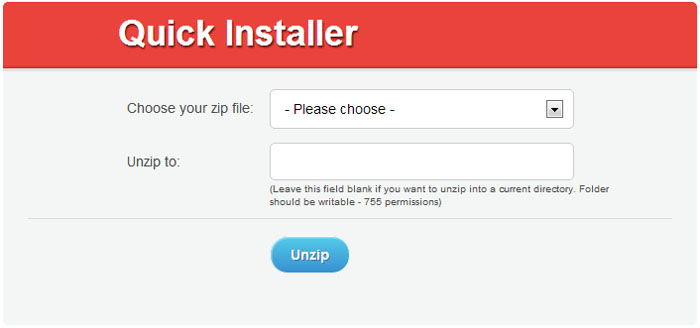
You should see the following screen:
In the 'Choose your zip file' select box please select the uploaded fullpackage.zip file.
In the 'Unzip to' field specify the directory where you want to extract the files.
Click the 'Unzip' button to proceed.
Please make sure to set the correct permissions for the directory where you are planning to extract the files. Permissions should be CHMOD 755 or 777 depending on your server configuration.
Magento Installation
When you are done with uploading files, you can start Magento engine installation process. Open your browser and in the address bar type your 'domain name/path to your Magento directory'. You should see the welcome screen. Please follow the instructions below to install Magento.
NOTE: the dump.sql.gz file should be imported into the clear database BEFORE you install Magento.
Step 1: Installation Assistant
Please read the license agreement and click the "Agree and Setup Magento" checkbox if you agree with the terms.
Server Readiness Check
Click the "Start Readiness Check" button to check your server settings compatibility with the Magento 2 engine requirements.
When the checking procedure is complete, click 'Next'. button.
Step 2: Database connection
Here you need to input the database details and some initial settings.
Add a Database – input your host name, database name, database user and password. Contact your hosting provider, if you don't have the necessary details.
Make sure you have a database created for the Magento installation. And also make sure it is clear, without any tables.
If everything is correct, click 'Next'. button.
Step 3: Web Configuration
Here you can change Magento admin panel URL and the main store address. Other settings you can leave unchanged.
Make a point of the admin panel path. Note it or insert your specific admin panel URL to remember the admin panel access.
When you are done, click 'Next'. button.
Step 4: Localization
Select the required time zone, default currency and store language. In the Advanced Modules Configurations section you can also select default modules that should/shouldn't be installed. We recommend that you do not perform changes in this section.
When you are done, click 'Next'. button.
Step 5: Create Admin Account
Here you need to input personal details for the store owner and administrator.
Step 6: Install
The store configuration is done. Press the Install Now button to start the store installation process.
Step 7: Success
This is the final installation step. Copy the generated encryption key and keep it safe.