Preparations
The PrestaShop e-commerce engine requires a MySQL database to store data. Prior to installing PrestaShop, please make sure you've already created - MySQL database. This can be done through your hosting control panel using a phpMyAdmin tool.
Please check the detailed tutorial on how to create a MySQL database. If any issues occur, please contact your hosting provider for further assistance.
While installing your MySQL database, you'll need to specify the database name, username, password and the database server. Remember these details, as you'll need them for PrestaShop installation.
PrestaShop engine installation
1. Server requirements
Please make sure your hosting server meets thePrestaShop requirements:
- System: Unix, Linux or Windows. Unix is highly recommended.
- Web server: Apache Web server 1.3 or later, Microsoft's IIS Web server 6.0 or later, and nginx 1.0 or later.
- PHP 5.2* or later.
- MySQL 5.0 or later.
- At least 32 Mb of RAM on your server (64 Mb is comfy, the more the better).
PrestaShop will work with PHP 5.1 or later, but the versions lower than 5.2 have bugs which might cause some functions not to work as expected (like invalid date timezone).
2. Downloading
To install PrestaShop you need to download the PrestaShop engine package from the official website at www.prestashop.com/en/downloads
Just insert your name and e-mail into the Download box input and click a 'Download' button.
Please make sure your version of PrestaShop engine matches the template requirements. All versions of PrestaShop are available at SourceForge.
3. Extracting Files
Once the PrestaShop engine package is downloaded, you will need to extract its files and folders from the archive.
This can be done with any archive manager like WinZip(PC), StuffitExpander(MAC) etc.
Please check the following tutorials on how to extract files from the archives with WinZip(PC) and StuffitExpander(MAC).
Please note: if your hosting control panel has the option to 'Extract' files, you can use it to extract the files directly on your server after the .zip file is uploaded.
4. Uploading PrestaShop engine files
In case you’ve extracted the files locally to your computer, you will need to upload them to your hosting server.
This can be done using the hosting control panel File Manager or third party FTP Manager applications like FileZilla, TotalCommander, CureFTP etc.
You can check the detailed video tutorial on how to upload files to server using FTP manager and how to upload files to a server using cPanel (WebHost Manager, WHM).
5. PrestaShop engine installation
When you are done with the files upload you can start the PrestaShop engine installation. Open your web browser and type in the 'domain name/path to your PrestaShop directory' in the address bar and reload the current page. You should see the welcome screen. Please follow the instructions below to install PrestaShop.
Step 1: Installation Assistant (Choose your language)
Please select the installation language
Please note: the installation language option won't affect your store language. By default PrestaShop is offered in English. You can install additional localization packages to change the store language.

When you are done, click 'Next' button.
Step 2: Installation Assistant (License agreements)
Please check the license agreement.
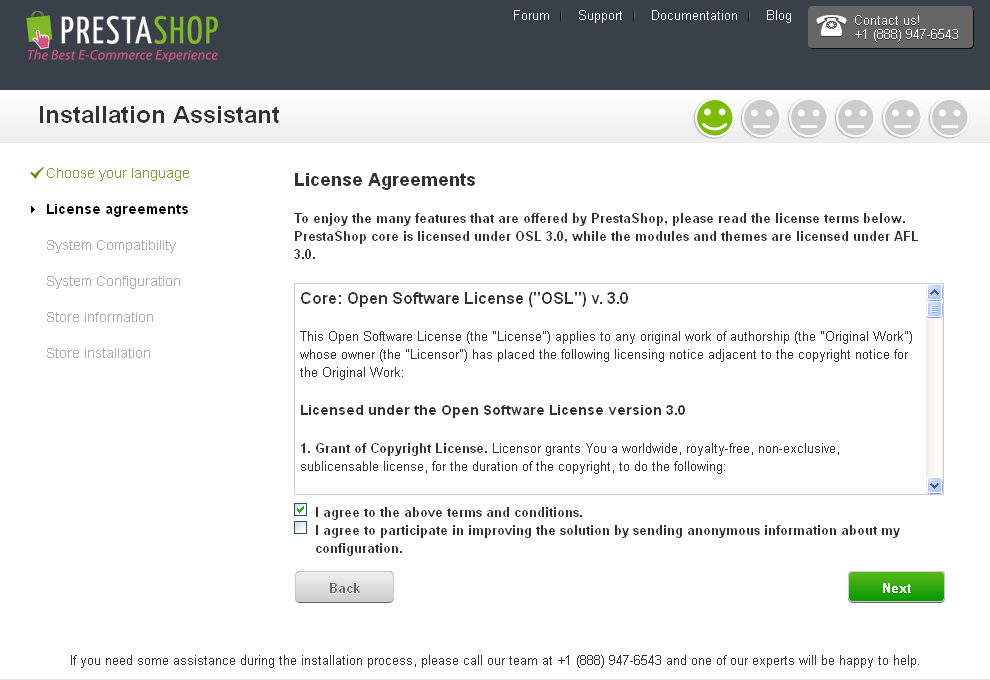
When you are done, click 'Next' button.
Step 3: System Compatibility
Check the PHP settings and directory permissions. In case of any errors, please contact your hosting provider for further assistance.

If everything is correct, click the 'Next' button.
Step 4: System Configuration
As you already have a MySQL database, please enter the database details into the appropriate fields below.
Otherwise, you can get the database details from your hosting control panel or by contacting hosting provider.

When you are done, click 'Next' button.
Step 5: Shop configuration
This step requires for you to enter the store settings like: Shop name, activity, country, timezone, upload your logo etc.
All these settings can be changed later in your PrestaShop administration panel.

Step 6: Installation is complete
This is the final step of the installation.

For security reasons you need to delete the /install/ directory on your hosting server.
Starting with version 1.5.4, PrestaShop takes care of renaming the administration folder for you: it becomes the word "admin" followed by 4 random digits, i.e "admin8814". The renaming happens as soon as you reach the "admin" folder for the first time: PrestaShop renames it, then correctly accesses the renamed folder.
Log in to the PrestaShop back-office by going to your newly-renamed "admin" folder, and start filling your catalog with your data.
Log in to the PrestaShop back-office by going to your newly-renamed "admin" folder, and start filling your catalog with your data.
In case of any difficulties you can check the official PrestaShop installation manual or the following tutorials How to install prestashop 1.5 engine.
PrestaShop Template installation
If you don't want to spend your time installing the template, don't hesitate to order installation service using our live-chat.
1. Template installation, using 'themeinstallator' module
This method not provide sample data installing.
1. Template preparation.
Before you proceed, please make sure you already downloaded the template and extracted the files from the template package. You can check detailed tutorials on how to extract the files from the template package using WinZip and StuffitExpander.
When the files are extracted, you can proceed to uploading the template.
2. Installation.
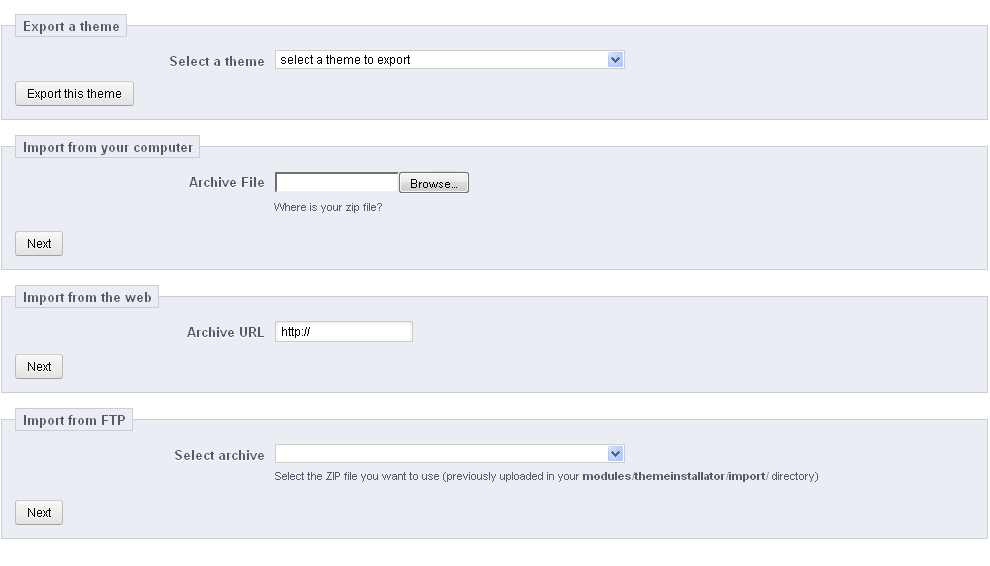
Open PrestaShop admin panel, go to the Modules->Modules menu. On this page, please open the Administration section. Here you will see the list of available modules. Find one called 'Import/export a theme v1.4' and click Configure.

Click theBrowse button and navigate to the "themeinstallator" folder inside of the template package to locate the archive with the template:
On the next page you will see information about the template you are installing. Click Next.

After these steps, you’ll see a notification saying that your template has been successfully installed and a menu with the module settings. Click Next.

The last step allows you to see the information about modifications performed by the module during installation. Click Finish.

2. Installing template without sample data
If you don't want to spend your time installing the template, don't hesitate to order installation service using our live-chat.
This installation method will suit you in case you are planing to change the store theme. This method won't harm your existing files or products database.
1. Uploading files and theme activation
Before you proceed, please make sure you already downloaded the template and extracted the files from the template package. You can check detailed tutorials on how to extract the files from the template package using WinZip and StuffitExpander.
When the files are extracted, you can proceed to uploading the template.
You can check a detailed video tutorial on how to upload files to server using FTP manager and how to upload files to a server using cPanel (WebHost Manager, WHM).
- Open the template package.
- Then go to the /theme/ folder.
- Upload /img/, /modules/ and /themes/ folders to the PrestaShop root directory.
- When you are done, open the PrestaShop admin panel.
- Select Preferences > Themes from the top menu.
- Select your template in the Themes section and click a Save button.
Your new theme should be active now. Now you need to configure the modules.
2. Installing and configuring modules
Each template is provided with some specific module settings. To make the modules appear as on the template preview, you will need to configure them. All modules can be configured in the PrestaShop admin panel.
1. In your PrestaShop admin panel from the top menu select Modules > Modules.
On the Modules page you can see the list of available PrestaShop modules. You may need to install some of them.
To install a module, locate it in the list and click the 'Install' button:

If installation has been done correctly you'll see the following message:

Using the module links you can activate modules (Enable|Disable links), reset settings to default (Reset link), delete module (Delete link) or configure them (Configure link).

2. After activating all necessary modules you need to assign them to correct positions.
In PrestaShop admin panel from the top menu select Modules > Positions. To place module in the required position just drag it to the position section of the modules list.

In some cases after the changes made to the image dimensions, you may need to regenerate images. This can be done through the Regenerate thumbnails section.
3. Template installation with sample data
If you don't want to spend your time installing the template, don't hesitate to order installation service using our live-chat.
After installing the Sample data, you'll get your PrestaShop store to look like the template preview page. It will contain all sample products, store settings, modules settings etc.
Please, do not use the sample data for your running website! This will replace all your store products and store settings.
1. Uploading template files
To upload template to your server,
- Open the template package
- Then go to the /theme/ folder
- Upload /img/, /modules/ and /themes/ folders to PrestaShop root directory
You can check the detailed video tutorial on how to upload files to server using FTP manager and how to upload files to a server using cPanel (WebHost Manager, WHM).
2. Installing Sample data
Sample data is provided as an .SQL file. It is located in the root of the template package and is called dump.sql
Dump.sql file can be installed using the phpMyAdmin tool or a database management tool in your hosting control panel. This detailed tutorial on how to install SQL files can help you.
Before you proceed, please backup your database. You can check a detailed video tutorial on how to backup a database.
Please, make sure your version of PrestaShop engine matches the template requirements. Otherwise the database will be damaged.
When you are done with installing the dump.sql file, you will need to activate the template.
From the PrestaShop admin panel, go to Preferences > Themes, choose your template in the Themes sections and click Save.
3. Adding languages to online store.
After the multi-language template has been installed, you will need to add all languages provided with iit (English, French, Spanish, German, Russian) to the online store platform. It can be done this way:
Go to 'Localization > Translations' in the admin panel, find 'Translation exchange', and add languages by choosing them from the drop-down menu and clicking the 'Add or update a language' button.

If you do not want to add some languages, you can delete or turn them off in 'Localization > Languages' menu.

4. Installing template over existing store
If you don't want to spend your time installing the template, don't hesitate to order installation service using our live-chat.
You can use this method of installation if you have a running PrestaShop website and just want to install a new template.
1. Uploading template files and theme activation
- Open the template package.
- Then go to the /theme/ folder.
- Upload /modules/ and /themes/ folders to PrestaShop root directory.
- Open the /img/ folder from the template package and upload logo.jpg, favicon.ico files to the /img/ folder of your PrestaShop installation
- From the PrestaShop admin panel go to Preferences > Themes, choose your template in the Themes sections and click Save.
You can check the detailed video tutorial on how to upload files to server using FTP manager and how to upload files to a server using cPanel (WebHost Manager, WHM).
2. Modules installation
Open PrestaShop admin panel and configure modules as described in the Installing template without sample data ->Installing and configuring modules section of this manual.
Do not use sample data if you have a running website as it will replace all your store products and store settings.
3. Configuring images
Open your PrestaShop admin panel and configure the images as described in the Installing template without sample data ->Configuring images section of this manual.
Basic tutorials
1. How to change store name
In order to change your store title, open the PrestaShop admin panel and go to Preferences > Store Contacts, section Contact details.
In the Shop name field, type your store name and click the Save button to save your changes.

2. How to edit header and footer links
Please check a detailed tutorial on how to edit header links.
3. How to edit slider
To edit the slider images, find the minic slider module on the Modules page of your PrestaShop store. It is located in the Advertising and Marketing modules section. Click the Configure button to edit the module.

On the module settings page you can change the slider options (such as width, height, speed, etc.) and edit slides (slide images, URLs, descriptions, etc.).

Cookie Policy
Following the Cookie Law conditions you can add sufficient modules to your website. Module will display a warning message about the cookies used on your website. You can use the following ones: