


- Web templates
- E-commerce Templates
- CMS & Blog Templates
- Facebook Templates
- Website Builders
FAQs
General Tutorials
Featured templates
MonsterONE Subscrioption


Our Support team is ready to present you a new tutorial that will become an indispensable guide for configuring customer account checkout settings in your Shopify store.
Shopify. How to manage checkout options
Let us show you how to manage checkout settings via the admin panel:
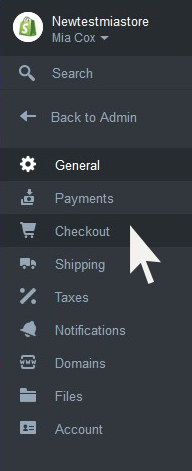
Please log into your Shopify admin panel and go to Settings:

Then click Checkout to go to your Checkout settings page:
First section is Customer accounts section. Here you can choose if you want to prompt the customer to make an account when they check out.
Here are options you are able to choose from:
When Accounts are disabled customers won’t see the option to create an account or to log in. They’ll have to manually enter their details at checkout, because fields won’t be pre-filled.
When Accounts are required customers must have an account and be logged in to place an order. This setting is useful if, for example, you’re running a wholesale or members-only store. Address fields are pre-filled when the customer places an order.
When Accounts are optional customers can choose to create an account but it’s not mandatory for checkout. If customers do have an account and they’re logged in, their address fields are pre-filled when they place an order:

In the next Fields settings section you can choose if you want to prompt the customer to fill in certain optional fields or not. We recommend disabling the fields you do not need.
Under Full name you can choose whether only first name or both first and last names are required during checkout procedure.
In the next two sections Apt, bldg, etc. and Company name you are able to choose if this information is Optional or Hidden during checkout process.
You may also choose one of 3 options for Phone number for your customer checkout – you can make it Hidden, Optional or Required:

Before you accept your first order through your online Shopify store, you must set up Order processing in the next section. Here you will set how your store responds to checkout and order events.
First of all, you can mark use the billing address as the shipping address by default checkbox if you need to. This reduces the number of fields required to check out.
During the checkout process, customers have the option to receive email updates from your store. By selecting Keep me updated – I want to receive occasional emails about new products, promotions and other news during checkout customers will be added to the Accepts Marketing group and you can email them with store updates, newsletters and discounts. Due to legal and privacy reasons, Shopify cannot add customers who do not want to receive email updates to this group. Only contact the people in the Accepts Marketing list with marketing materials.
This feature can be customized under Collecting consent to send promotional emails to customers from your store section. Here are the options to choose from:
If Customer agrees by default customers emails are collected and customers will automatically receive updates from your shop if this option is enabled.
If Customer disagrees by default customers emails are not collected and customers will not automatically receive updates from your shop if this option is disabled.
If Option is disabled and hidden then it does not appear at all at the front end of your store.
After an order has been paid you may choose either Automatically fulfill the order’s line items or Do not automatically fulfill any of the order’s line items.
After an order has been fulfilled and paid mark Automatically archive the order checkbox if you want to archive your orders automatically. An archived order is an order that you have completed and closed in your admin. Archiving an order allows you to easily keep track of your open orders that have not yet been completed. Archiving an order is the best practice to make sure that you have an accurate count of open orders in your store’s Admin.
Now let us move to the next Additional content and scripts section.
The Additional content and scripts box is used in inject code into your Thank You page of the checkout. You can inject:

In the next drop down you are able to pick up Checkout language:

In the last Refund, privacy and TOS statements section you may paste the Refund Policy, Privacy Policy and Terms of Service statements that will appear in the footer of your checkout page.
You can generate text of these policies using a sample template by pressing Generate sample policy button at the right. You will see that sample text will appear in the text area after performing this action. Feel free to change it as you like:

Press Save button to apply all the changes that you’ve made:

That’s it! Now you know how to manage checkout options in your Shopify store. Please, feel free to check the detailed video tutorial below:
