


- Web templates
- E-commerce Templates
- CMS & Blog Templates
- Facebook Templates
- Website Builders
FAQs
General Tutorials
MonsterONE Subscrioption


This tutorial will show you how to manage menus in WordPress Cherry Framework based templates.
WordPress. How to manage menus
1. Open the WordPress admin panel.
2. Go to Appearance > Menus.
In it, you will be able to see all the available menus with menu items:

1. Here you can link a menu item to a page.
2. Here you can link a menu item to posts.
3. Use these buttons to edit menus or to assign menus to the header or footer area.
4. The menu items can be linked to external URLs. This block allows you to insert the menu item custom URL.
5. Allows you to select the menu to edit.
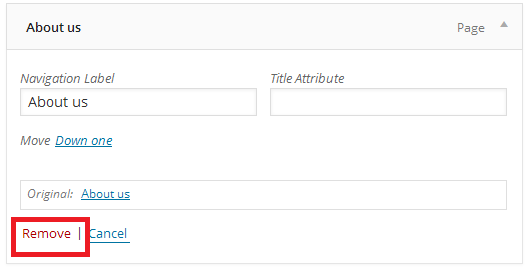
1. Locate the menu item that you want to remove in the menu editor window.
2. Click on the arrow icon in the top right-hand corner of the menu item/box to expand it.
3. Click on the Remove link. The menu item/box will be immediately removed.
4. Click the Save Menu button to save your changes.
To make one menu item a subordinate of another, you need to position the ‘child’ underneath its ‘parent’ and then drag it slightly to the right.
The WordPress menu editor allows you to create multi-level menus using a simple ‘drag and drop’ interface. Drag menu items up or down to change their order of appearance in the menu. Drag menu items left or right in order to create sub-levels within your menu.

Feel free to check the detailed video tutorial below:
