


- Web templates
- E-commerce Templates
- CMS & Blog Templates
- Facebook Templates
- Website Builders
FAQs
General Tutorials
Featured templates
MonsterONE Subscrioption


The following tutorial shows how to use Advanced Stock management tool in PrestaShop 1.6. This feature allows to manage your stock in detail. It helps you to keep track of warehouses, view the stock and its movement, as well as coverage and supply orders.
PrestaShop 1.6.x. How to manage Advanced Stock
Log into your PrestaShop 1.6. dashboard.
Navigate to Preferences -> Products.
Scroll down to the bottom of the page and look for a section named Products Stock. Change Enable advanced stock management option to Yes.
Click Save button to save the setting:

When you enable it, a new menu (Stock) with several sub-menus will appear on the left.
NOTE: If you wish to use the advanced stock management, you must check the following:
Associate your products with warehouses.
Associate your warehouses with carriers.
Associate your warehouses with the appropriate shops.
You should first create at least one warehouse before associating a product to it and setting the product location in it.
Navigate to Stock -> Warehouse and click Add new warehouse button:
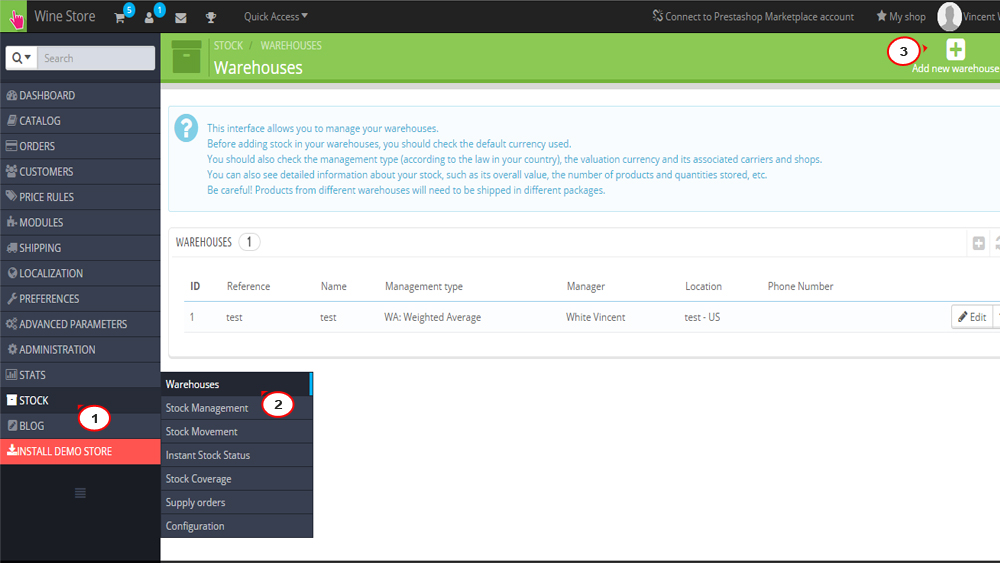
Fill in the following fields:
Reference and Name. The unique reference identifier and name of the warehouse.
Address, Postcode/Zip Code, City and Country. The physical address of warehouse.
Manager. A person in charge of the warehouse (it can be only one of your store employees.).
Carriers. The carriers who you authorize for orders shipping from this warehouse.
NOTE: If no carriers are selected for the warehouse, it will be impossible to order anything from that warehouse.
Management type. A method of accounting valuation, based on your country’s regulations. Please check the official PrestaShop documentation for more information.
Stock valuation currency. A valuation currency for the stock of this warehouse (among the registered currencies):

Click Save button to save the settings.
To set the stock for each warehouse, navigate to Stock -> Stock Management:

You can manage products from the Details action:
Add stock. This button adds stock for a specific product in a given warehouse. You can specify the quantity to add, usability for sale, warehouse, unit price, currency and label.
Remove stock. This button removes stock for a specific product in a given warehouse. You can specify the quantity to remove, usability for sale, warehouse and label.
Transfer stock. This button transfers stock from one warehouse to another. Specify the quantity to transfer, source and destination warehouses.
This interface enables you to view the stock movement history. You can display all of the stock movements, or only those tied to one warehouse. When the Filter movements by warehouse drop-down list is set to a warehouse, you can make a CSV export of the obtained list:

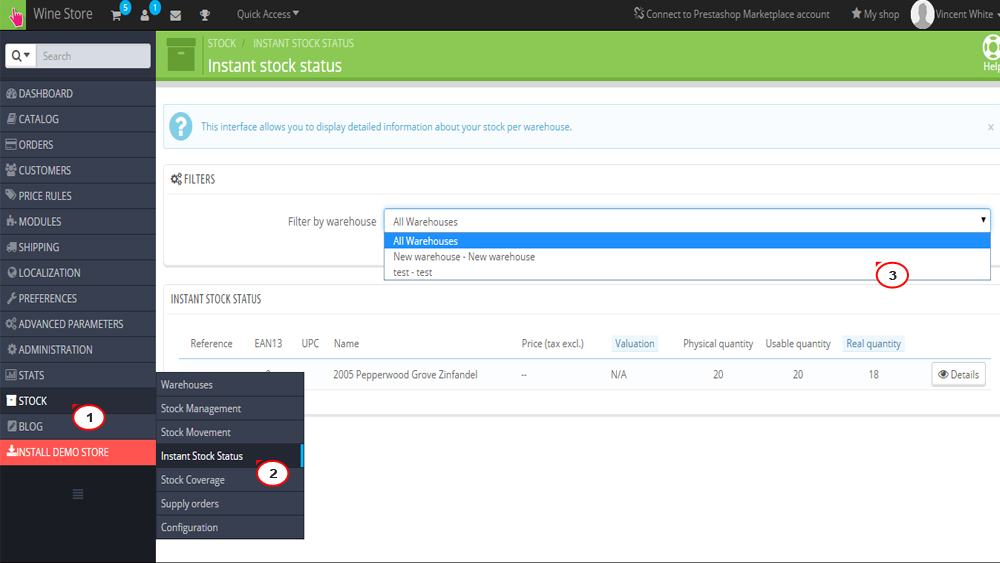
This interface enables you to have an instant overview of your stock, either globally or per warehouse:
This interface enables you to overview the coverage of your stock. The coverage indicates how many days your current stock can last. In order to view the stock coverage of product combinations, you have to click the Details action of the product:

This interface enables you to manage all your supplier orders, as well as reusable order templates.
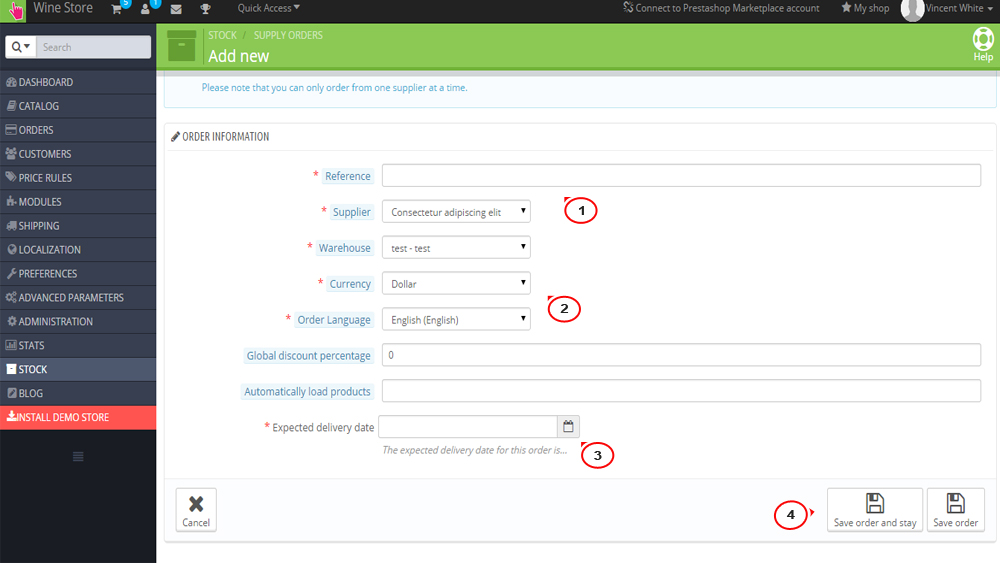
To create a new order, navigate to Stock -> Supply orders and click Add new supply order button:

Fill in the following data:
Set the unique reference number. This is an administrative number.
Select the supplier. If the supplier you want is not in the drop-down list, you must create it in the Catalog -> Suppliers.
Select the warehouse which will take delivery of the order.
Select the currency in which the order will be formalized.
Select the language in which the order will be formalized.
If needed, set the global discount on the order and the physical quantity of a product below which all the products have to be restocked.
Set the expected delivery date.
Click Save order and stay or Save order button to save the order:
The configuration page enables you to customize the way certain parts of the advanced stock manager work:
The available statuses for a supply order.
The labels for the stock movements.
The default statuses for some stock movements which are used throughout the solution.
To make the product usable by advanced stock management, navigate to Catalog -> Products and click the required product.
Open Quantities tab and enable I want to use the advanced stock management system for this product and The available quantities for the current product and its combinations are based on the stock in your warehouse options:
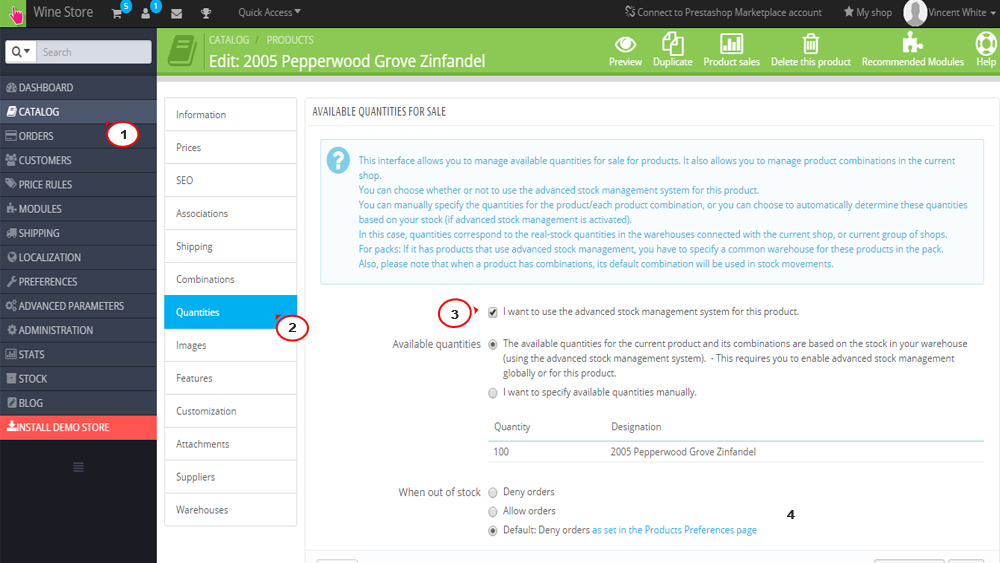
Switch to Warehouses tab and check if the required warehouse is selected.
Click Save button to save the changes.
That is the end of the tutorial. Now you know the main principles of using Advanced Stock Management in Prestashop 1.6.
Feel free to check the detailed video tutorial below:
