


- Web templates
- E-commerce Templates
- CMS & Blog Templates
- Facebook Templates
- Website Builders
FAQs
General Tutorials
Featured templates
MonsterONE Subscrioption


In this tutorial we will show you how to create a .CSV file for Shopify. Using this .CSV file you will be able to import Products to the store.
Shopify. How to create CSV file for products import
Before we proceed, we need to install the program which will be used to edit the .CSV file. We recommend using OpenOffice Calc program.
Follow this link to download the OpenOffice program: https://www.openoffice.org/.
Click I want to download Apache OpenOffice link.
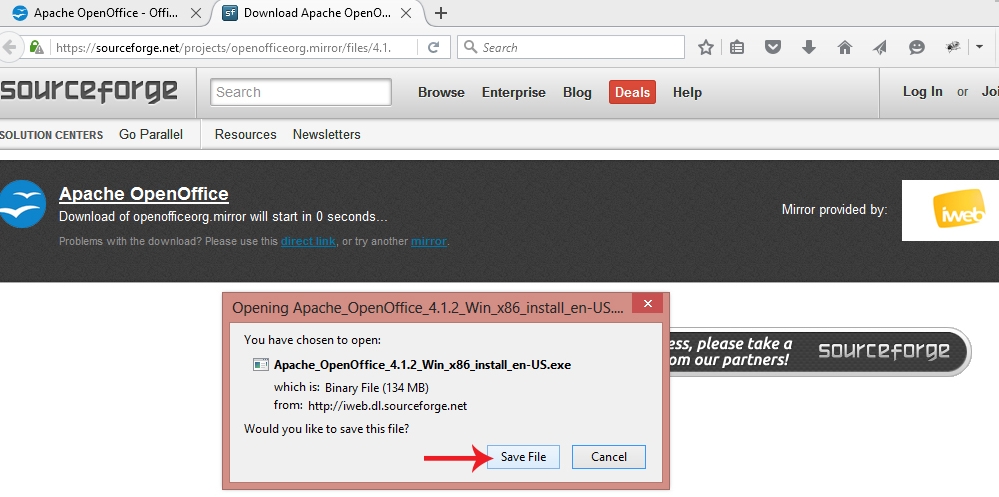
On the next page, select your OS and language, then click on Download full installation button:

In the next window, click on Save File button:
Once it is done, go to the file download location and proceed with OpenOffice program installation.
You can choose whether to add/import Simple Product(s) or Product(s) With Variants:
Simple Product (Does Not Contain Variants) – when uploading products without variants, download the sample shopify_example_simple.csv file using this link.
Note that you should only add the handle values and the URL for each additional image.
Product With Variants – when uploading products with variants, you must specify all the fields in the sample shopify_example_variants.csv file.
You may skip the Title, Body (HTML), Vendor and Tags fields and then fill out the rest of the variants details along with each image URL.
Download the sample example .CSV file.
Open an example .CSV file using OpenOffice Calc program. Apply the following settings:
The Character set should be Unicode (UTF-8).
The Comma option should be checked by default.
Otherwise, please select the Comma option.
Click OK button to proceed:

In the example file you will see a couple of products included there for an example.
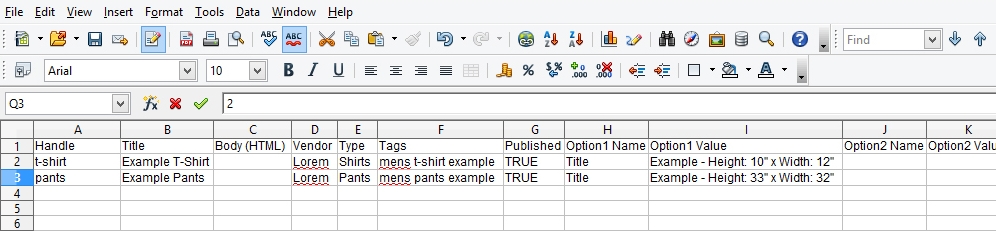
Using the example products, add your own products. The first line should include headers fields described below, in the same order, separated by commas. The following lines in the file must contain data for your product using the same fields in the same order:
Handle – a unique name of the product. This field may contain letters, dashes and numbers. This field should not contain spaces as it will be used in the URL for the product.
NOTE: Each row in the CSV file, starting with a different handle, is considered as a new product. If you want to add multiple images to a product, or it is a product with options/variants, you must have several lines with the same handle.
Title – the actual Name of your product. This field shouldn’t be empty.
Body (HTML) – specify the product description. This field shouldn’t be empty and may include plain text or HTML.
Vendor – specify the vendor for your product. This field shouldn’t be empty and should include a minimum of two characters.
Type – specify the product type. This field shouldn’t be empty.
Tags – specify the list of tags to tag your product(s) separated by a comma. This field can be left empty.
Published – specify whether you wish to enable or disable the product on your site. An empty field will enable/publish the product.
Option1 Name – specify the product(s) option name, for example Size or Color. For the product(s) without options, this field should include a Title as a field value. This field should not be empty.
Option1 Value – specify the product(s) option value, for example Large or Green. For the product(s) without options, this field should include a Default Title as a field value. This field should not be empty.
Option2 Name – specify the product(s) second option name (if exists), for example Size or Color. This field can be left empty.
Option2 Value – specify the product(s) second option value (if exists), for example Small or Blue. This field can be left empty.
Option3 Name – specify the product(s) second option name (if exists), for example Size or Color. This field can be left empty.
Option3 Value – specify the product(s) second option value (if exists), for example Small or Blue. This field can be left empty.
Variant SKU – specify the unique identifier of the product or variant. It shouldn’t contain special characters or capital letters.
Variant Grams – specify the weight of your product or variant. It shouldn’t contain a unit of measurement and should not be empty.
Variant Inventory Tracker – specify an inventory tracking for product or variant. This field can be left empty.
Variant Inventory Quantity – specify the product or variant quantity. This field should not be empty.
Variant Inventory Policy – specify what to do with the order(s) when the inventory level for this product or variant reaches zero. This filed may include the following values:
This field should not be empty.
Variant Fulfillment Service – specify the fulfillment service used. This field may include the following values:
NOTE: you can use a custom name for your use fulfillment service. The name should not include spaces (replace the space with a dash), should include lowercase letters without periods and other special characters.
Also, you must include and set up this custom name in Shopify Admin panel prior to adding in the .CSV file.
Variant Price – specify the product or variant price. This field should not be empty and should not include a currency symbol.
Variant Compare at Price – specify the product or variant Compare at Price. This field should not be empty and should not include a currency symbol.
Variant Requires Shipping – specify whether the product or variant require shipping. This field may include the following values:
Leaving this field empty will be considered as FALSE.
Variant Taxable – specify whether to apply taxes or not. This field may include the following values:
Leaving this field empty will be considered as FALSE.
Variant Barcode – specify the ISBN or UPC of the product. This field may be empty.
Image Src – specify the URL of your product images including a full path:http://cdn.shopify.com/s/images/product_t-shirt.png?e6948c562648602cc472e3b89aae0f3
NOTE: Do not include images for the product variant(s) as this should be done on the variant images field. Place additional product images URLs on the next line:
Image Alt Text – specify the description of an image. This field may be empty.
Gift Card – specify whether the product is a Gift Card or not. This field may include the following values:<.p>
NOTE: you may place additional Gift Card details, however this can not be created via .CSV file but rather should be created within the Shopify Admin first.
Metafields
SEO Title – specify the SEO title which will be visible on a product’s details under the Search Engines header, limited to 70 characters. This field should include letters and number and does not require the Google Shopping App.
SEO Description – specify the SEO Description which will be visible on a product’s details under the Search Engines header, limited to 160 characters. This field should include letters and number and does not require the Google Shopping App.
Google Shopping / Google Product Category – specify the set of product categories used by Google. This field requires Google Shopping App.
Google Shopping / Gender – specify the gender for the product, such as Female, Male, or Unisex. This field requires Google Shopping App.
Google Shopping / Age Group – specify the age group for the product, such as Adult or Kids. This field requires Google Shopping App.
Google Shopping / MPN – specify the Manufacturer Part Number in a string of alphanumeric digits. This field requires Google Shopping App.
Google Shopping / Adwords Grouping – this field is used to group products by attributes. This field requires Google Shopping App. For more information, please visit: https://support.google.com/merchants/answer/188494?hl=en.
Google Shopping / Adwords Labels – similar to Adwords Grouping but only works on Cost Per Click. This field requires Google Shopping App. For more information please visit https://support.google.com/merchants/answer/188494?hl=en.
Google Shopping / Condition – specify the condition or quality of the product. This field may include the following values:
This field requires Google Shopping App. For more information please visit: https://support.google.com/merchants/answer/188494?hl=en.
Google Shopping / Custom Product – specify whether this product has a unique product identifier. This field may include the following values:
This field requires Google Shopping App. For more information please visit https://support.google.com/merchants/answer/188494?hl=en.
Google Shopping / Custom Label 0 – specify a specific definition for each label, such as Sale or Clearance. This field requires Google Shopping App.
NOTE: you may only have up to 5 custom labels for your product numbered 0 through 4
Google Shopping / Custom Label 1 – specify a specific definition for each label, such as Sale or Clearance. This field requires Google Shopping App.
NOTE: you may only have up to 5 custom labels for your product numbered 0 through 4
Google Shopping / Custom Label 2 – specify a specific definition for each label, such as Sale or Clearance. This field requires Google Shopping App.
NOTE: you may only have up to 5 custom labels for your product numbered 0 through 4
Google Shopping / Custom Label 3 – specify a specific definition for each label, such as Sale or Clearance. This field requires Google Shopping App.
NOTE: you may only have up to 5 custom labels for your product numbered 0 through 4
Google Shopping / Custom Label 4 – specify a specific definition for each label, such as Sale or Clearance. This field requires Google Shopping App.
NOTE: you may only have up to 5 custom labels for your product numbered 0 through 4
Variant image – specify your product variant image URL. This field should not be empty if you have product variants.
Variant Weight Unit – allows you to convert the variant grams value to a different unit of measure. You may use the following values:
This field can be left empty.
Variant Tax Code – specify the tax code in relation to a specific variant of the product. This field can be left empty.
Collection – specify the name of a Collection (category) into which you wish to place the product. If such Collection does not exist, it will be created. This field can be empty.
NOTE: You may only add a product to one Collection.
How to prepare your images for the product import
Your product images must be on an existing website. The URLs of the products will only be used to import them to your store. They can be removed from the server after the import is done.
Image files which are stored on your local computer can be uploaded to your Shopify website to get the valid image URL.
If you have your product images on another website (on another platform, such as PrestaShop, OpenCart, Magento etc.,) you may copy the current image URLs and use it in the .CSV file.
If the .CSV file was created by exporting the .CSV from Shopify website, then you can keep your image URLs as is.
When you are done, go to File -> Save As.
Keep the Text CSV (.csv)(*.csv) type. Check the Edit filter settings option.
Then click Save button:

In the popup window, make sure to select the Character set: UTF-8. Select the Comma field delimiter.
Click OK:

This is it. Now we have a correct .CSV file for Shopify site.
Thank your for reading this tutorial. Now you can create a complete and valid .CSV file for your Shopify online store.
Feel free to check the detailed video tutorial below:
Shopify. How to create CSV file for products import