- Web templates
- E-commerce Templates
- CMS & Blog Templates
- Facebook Templates
- Website Builders
ZenCart. How to create downloadable product
February 23, 2015
This tutorial shows how to create a downloadable product in ZenCart.
ZenCart. How to create downloadable productFirst of all, you need to upload the files to your store’s download directory on server before trying to link those files to products/attributes.
NOTE:
Download file names should not use special characters, spaces, etc.
Download files should be zipped for best results and best compatibility for most customers and browsers.
On a Windows server /pub does NOT need to be writable (have 777 permission) since you do not use this directory because symlinks typically don’t work on Windows servers, and Redirect is OFF since Redirect requires symlink support.
If not on a Windows server, meaning Linux/Unix, /pub should be writable (usually 777 or 755 depending on the host server) and Redirect should be ON.
If you cannot use Redirect ON, ask your hosting site why they cannot follow the symbolic link between the /download and /pub directories
-
In order to create a downloadable product, you will need to log into your admin panel and go to Catalog > Categories/Products and choose the category you need:

-
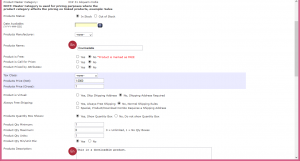
In the category you need to click on New product and then enter the product details:

NOTE:
Downloads are NOT Virtual Products, so use Product is Virtual: No, Shipping Address Required.
Downloads are NOT Always Free Shipping, so use Always Free Shipping: No, Normal Shipping Rules:

As soon as you finish the editing of the product information, please click the Preview button. You will see the new product view.
If you want to finish editing the product information, click Insert:

-
Now we need to add the downloadable attribute to the product. Go to Catalog > Option Name Manager in the admin and fill in the necessary fields:
- Option Name. e.g. Downloadable
- Option type. Select either Radiobutton or Dropdown.
and click insert:

Go to Catalog > Option Value Manager and fill in the fields:
- Option Name. Select the attribute which we added – Downloadable
- Option Value. Enter the value for your attribute. e.g. MS Word Zip
- Default Order. Give a default Sort Order like 10, 20, 30, 40, etc.
and click insert.It is also a good idea to make a Default Option Value that the Customer cannot add to the cart to force the Customer to make a proper choice with:
Option Name: Downloadable
Option Value: Choose the file type (or something that suits your site best)
Option Sort Order: 0
Default Attribute to be Marked Selected: YES
Use for Display Purposes Only: YES

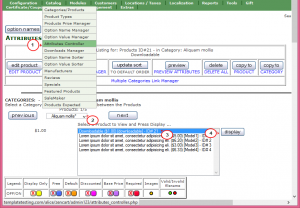
- Then go to Attributes Controller.
Pick up a category, select a product and click display:

Scroll down to see the Add Attributes box where the product name should already be selected.
Select the Option Name e.g.Download.
Select a matching Option Value, e.g MS Word Zip.
Enter Filename (the name of the file you uploaded to the /download/ folder).
Besides, there are Attribute Flags in the colored boxes used to distinguish such features of the attribute as:
- Use for display only (attribute cannot be selected and added to cart. Good for things like "Select from Below").
- Attribute is Free when product is Free.
- Default Attribute (used mostly on Radio buttons).
- Apply Discounts used by Product Sale/Special (used to add the same type of discount that the product is getting from the products_price vs the special or sale price)
- Include in Base Price (when products are priced by attributes mark the attributes include in base price then the lowest price in each Option Name group are added together to make up the product price)
- Attribute Required for text (some text is required text and cannot be left blank by the customer)
When you are done, click insert, go to the product page on your site to preview the changes.
Feel free to check the detailed video tutorial below:
ZenCart. How to create downloadable product


